Python: write a Twitter client
Why fill up the internet with pointless 140-character drivel yourself when you can write an application to do it for you?
This issue we’re going to create our own Twitter application using Python and two libraries: Tweepy, a Twitter Python library, and our old favourite EasyGUI, a library of GUI elements. This project will cover the creation of the application using Python and also the configuration of a Twitter application using the Twitter development website dev.twitter.com.
Tweepy is a Python library that enables us to create applications that can interact with Twitter. With Tweepy we can:
- Post tweets and direct messages.
- View our time line.
- Receive mentions and direct messages.
- Search for hashtags.
Now you may be thinking “Why would I want to use Python with Twitter?” Well, dear reader, quite simply we can use Python to build our own applications that can use Twitter in any of the ways listed above. But we can also use Twitter and Python to enable interaction between the web and the physical world. We can create a script that searches for a particular hashtag, say #linuxvoice, and when it finds it, an LED can flash, a buzzer can buzz or a robot can start navigating its way around the room.
In this tutorial we will learn how to use Tweepy and how to create our own application.
At the end of this project you will have made a functional Twitter client that can send and receive tweets from your Twitter account.
Downloading Tweepy and EasyGUI
Tweepy The simplest method to install Tweepy on your machine is via Pip, a package manager for Python. This does not come installed as standard on most machines, so a little command line action is needed. The instructions below work for all Debian- and Ubuntu-based distros.
First, open a terminal and type sudo apt-get update to ensure that our list of packages is up to date. You may be asked for your password – once you have typed it in, press the Enter key.
You will now see lots of on-screen activity as your software packages are updated. When this is complete, the terminal will return control to you, and now you should type the following to install Pip. If you are asked to confirm any changes or actions, please read the instructions carefully and only answer ‘Yes’ if you’re happy.
sudo apt-get install python-pip
With Pip installed, our attention now shifts to installing Tweepy, which is accomplished in the same terminal window by issuing the following command.
sudo pip install tweepy
Installation will only take a few seconds and, when complete, the terminal will return control to you. Now is the ideal time to install EasyGUI, also from the Pip repositories.
pip install easygui

To create an application you will need to sign in with the Twitter account that you would like to use with it.
Twitter apps
Twitter will not allow just any applications to use its platform – all applications require a set of keys and tokens that grant it access to the Twitter platform.
The keys are:
- consumer_key
- consumer_secret
And the tokens are:
- access_token
- access_token_secret
To get this information we need to head over to https://dev.twitter.com and sign in using the Twitter account that we wish to use in our project. It might be prudent to set up a test account rather than spam all of your followers. When you have successfully signed in, look to the top of the screen and you’ll see your Twitter avatar; left-click on this and select “My Applications”. You will now see a new screen saying that you don’t have any Twitter apps, so let’s create our first Twitter app.
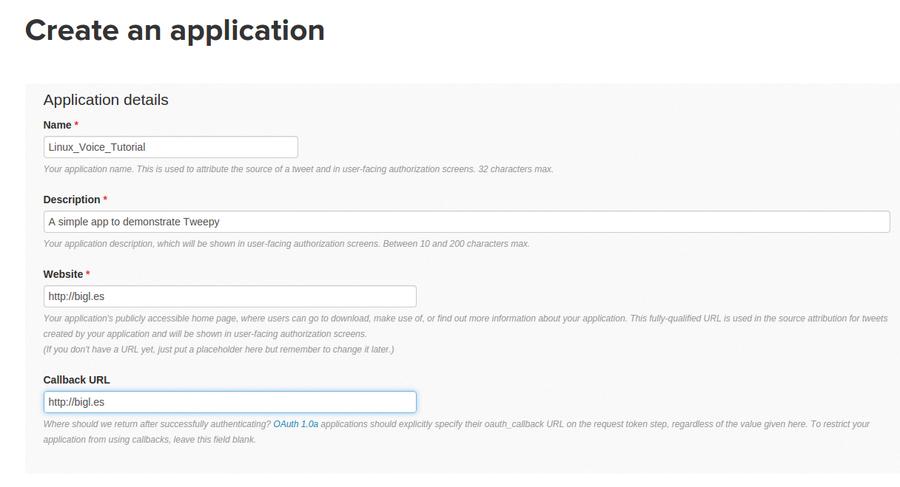
To create our first app, we need to provide four pieces of information to Twitter:
- The name of our application.
- A description of the application.
- A website address, so users can find you. (This can be completed using a placeholder address.)
- Callback_URL. This is where the application should take us once we have successfully been authenticated on the Twitter platform. This is not relevant for this project so you can either leave it blank or put in another URL that you own.
After reading and understanding the terms and conditions, click on “I Agree”, then create your first app. Right about now is an ideal time for a cup of tea.
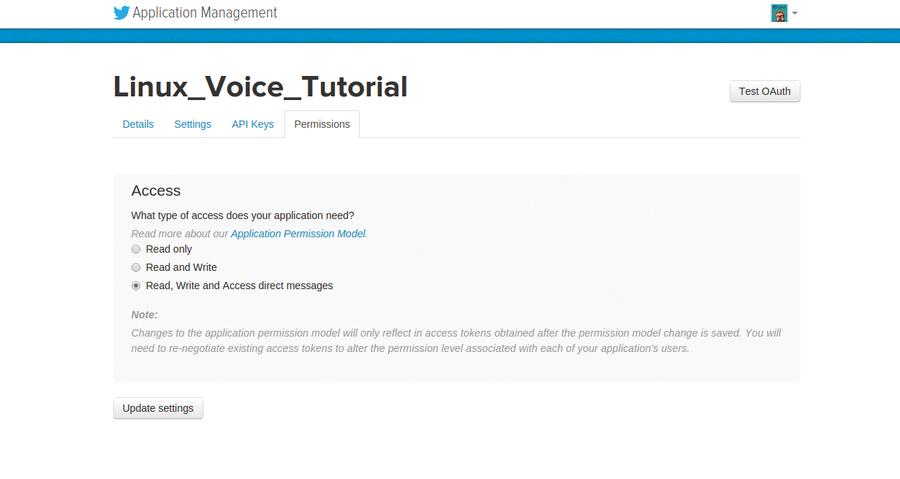
With refreshment suitably partaken, now is the time to tweak the authentication settings. Twitter has auto generated our API key and API secret, which are our consumer_key and consumer_secret respectively in Tweepy. We can leave these as they are. Our focus is now on the Access Level settings. Typically, a new app will be created with read-only permissions, which means that the application can read Twitter data but not post any tweets of direct messages. In order for the app to post content, it first must be given permission. To do this, click on the “modify app permissions” link. A new page will open from which the permissions can be tweaked. For this application, we need to change the settings to Read and Write. Make this change and apply the settings. To leave this screen, click on the Application Management title at the top-left of the page.
We now need to create an access token, which forms the final part of our authentication process. This is located in the API Keys tab. Create a new token by clicking Create My Access Token. Your token will now be generated but it requires testing, so scroll to the top-right of the screen and click “Test OAUTH”. This will test your settings and send you to the OAuth Settings screen. In here are the keys and tokens that we need, so please grab a copy of them for later in this tutorial. These keys and tokens are sensitive, so don’t share them with anyone and do not have them available on a publicly facing service. These details authenticate that it is YOU using this application, and in the wrong hands they could be used to send spam or to authenticate you on services that use the OAuth system.
With these details in hand, we are now ready to write some Python code.
Creating a new application is an easy process, but there are a few hoops to jump through in order to be successful.
Python
For this tutorial, we’ll use the popular Python editor Idle. Idle is the simplest editor available and it provides all of the functionality that we require. Idle does not come installed as standard, but it can be installed from your distribution’s repositories. Open a new terminal and type in the following.
For Debian/Ubuntu-based systems
sudo apt-get install idle-python2.7
With Idle now installed it will be available via your menu, find and select it to continue.
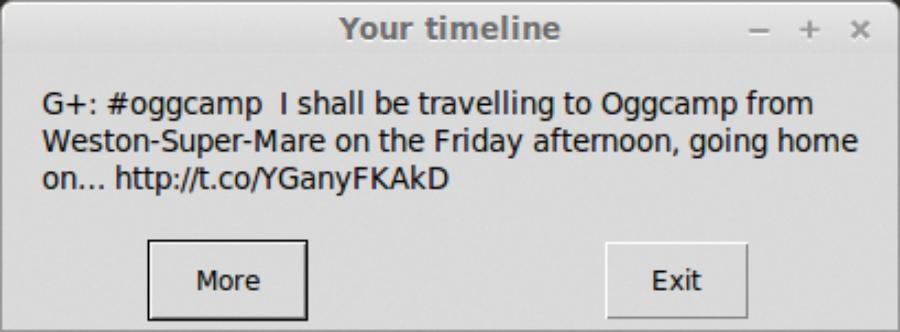
Idle is broken down into two areas: a shell where ideas can be tried out, and where the output from our code will appear; and an editor in which we can write larger pieces of code (but to run the code we need to save and then run the code). Idle will always start with the shell, so to create a new editor window go to File > New and a new editor window will appear. To start with, let’s look at a simple piece of test code, which will will ensure that our Twitter OAuth authentication is working as it should and that the code will print a new tweet from your timeline every five seconds.
import tweepy
from time import sleep
import sys
In this first code snippet we import three libraries. The first of these is the tweepy library, which brings the Twitter functionality that we require. We import the sleep function from the time library so that we can control the speed of the tweets being displayed. Finally we import the sys library so that we can later enable a method to exit the Twitter stream.
consumer_key = "API KEY"
consumer_secret = "API SECRET"
access_token = "=TOKEN"
access_token_secret = "TOKEN SECRET"
In this second code snippet we create four variables to store our various API keys and tokens. Remember to replace the text inside of the “ “ with the keys and tokens that you obtained via Twitter.
auth = tweepy.OAuthHandler(consumer_key, consumer_secret)
auth.set_access_token(access_token, access_token_secret)
For the third code snippet we first create a new variable called auth, which stores the output of the Tweepy authorisation handler, which is a mechanism to connect our code with Twitter and successfully authenticate.
api = tweepy.API(auth)
public_tweets = api.home_timeline()
The fourth code snippet creates two more variables. We access the Twitter API via Tweepy and save the output as the variable api. The second variable instructs Tweepy to get the user’s home timeline information and save it as a variable called public_tweets.
for tweet in public_tweets:
try:
print tweet.text
sleep(5)
except:
print("Exiting")
sys.exit()
The final code snippet uses a for loop to iterate over the tweets that have been gathered from your Twitter home timeline. Next up is a new construction: try and except. It works in a similar fashion to if and else, but the try and except construction is there to follow the Python methodology that it’s “Easier to ask for forgiveness than for permission”, where try and except relates to forgiveness and if else refers to permission. Using the try and except method is seen as a more elegant solution – you can find out why at https://docs.python.org/2/glossary.html#term-eafp.
In this case we use try to print each tweet from the home timeline and then wait for five seconds before repeating the process. For the except part of the construction we have two lines of code: a print function that prints the word “Exiting”, followed by the sys.exit() function, which cleanly closes the application down.
With the code complete for this section, save it, then press F5 to run the code in the Idle shell.
Applications are set to be read-only by default, and will require configuration to enable your application to post content to Twitter.
Sending a tweet
Now that we can receive tweets, the next logical step is to send a tweet from our code. This is surprisingly easy to do, and we can even recycle the code from the previous step, all the way up to and including:
api = tweepy.API(auth)
And the code to send a tweet can be easily added as the last line:
api.update_status("Tinkering with tweepy, the Twitter API for Python.")
Change the text in the bracket to whatever you like, but remember to stay under 140 characters. When you’re ready, press F5 to save and run your code. There will be no output in the shell, so head over to your Twitter profile via your browser/Twitter client and you should see your tweet.
We covered EasyGUI in LV006, but to quickly recap, it’s a great library that enables anyone to add a user interface to their Python project. It’s easier to use than Tkinter, another user interface framework, and ideal for children to quickly pick up and use.
For this project we will use the EasyGUI library to create a user interface to capture our status message. We will then add functionality to send a picture saved on our computer.
Using EasyGUI we can post new messages to the desktop via the msgbox function.
Adding a user interface
Open the file named send_tweet.py and let’s review the contents.
import tweepy
from time import sleep
import sys
import easygui as eg
This code snippet only has one change, and that is the last line where we import the EasyGUI library and rename it to eg. This is a shorthand method to make using the library a little easier.
consumer_key = "Your Key"
consumer_secret = "Your secret”
access_token = "Your token"
access_token_secret = "Your token"
auth = tweepy.OAuthHandler(consumer_key, consumer_secret)
auth.set_access_token(access_token, access_token_secret)
api = tweepy.API(auth)
These variables are exactly the same as those previously.
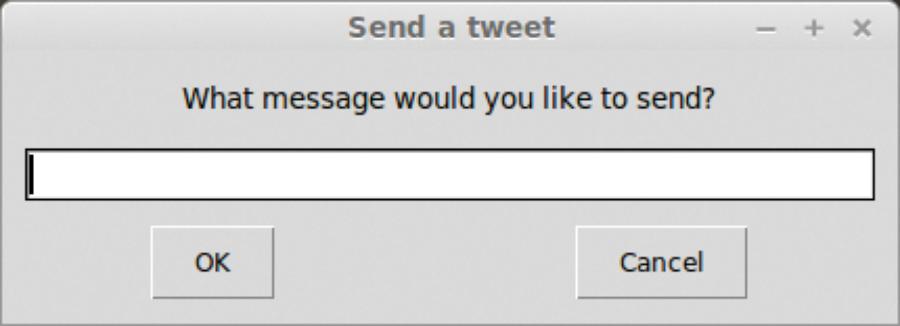
message = eg.enterbox(title="Send a tweet", msg="What message would you like to send?")
This new variable, called message, stores the output of the EasyGUI enterbox, an interface that asks the user a question and captures their response. The enterbox has a title visible at the top of the box, and the message, shortened to msg, is a question asked to the user.
try:
length = len(message)
if length < 140:
api.update_status(message)
else:
eg.msgbox(msg="Your tweet is too long. It is "+str(length)+" characters long")
except:
sys.exit()
For this final code snippet we’re reusing the try except construction. Twitter has a maximum tweet length of 140 characters. Anything over this limit is truncated, so we need to check that the length is correct using the Python len function. The len function will check the length of the variable and save the value as the variable length.
With the length now known, our code now checks to see if the length is less than 140 characters, and if this is true it runs the function update_status with the contents of our message variable. To see the output, head back to Twitter and you should see your tweet. Congratulations! You have sent a tweet using Python. Now let’s put the icing on the cake and add an image.
EasyGUI looks great and is an easy drop-in-replacement for the humble print function.
Adding an image to our code
The line to add an image to our tweet is as follows
image = eg.fileopenbox(title="Pick an image to attach to your tweet")
We create a variable called image, which we use to store the output from the EasyGUI fileopenbox function. This function opens a dialog box similar to a File > Open dialog box. You can navigate your files and select the image that you wish to attach. Once an image is chosen, its absolute location on your computer is saved as the variable image. The best place to keep this line of code is just above the line where the status message is created and saved as a variable called message. With the image selection handled, now we need to modify an existing line so that we can attach the image to the update.
Navigate to this line in your code:
api.update_status(message)
And change it to this:
api.update_with_media(image, status=message)
Previously we just sent text, so using the update_status function and the message contents was all that we needed, but to send an image we need to use the update_with_media function and supply two arguments: the image location, stored in a variable for neatness; and the status update, saved as a variable called message.
With these changes made, save the code and run it by pressing F5. You should be asked for the images to attach to your code, and once that has been selected you will be asked for the status update message. With both of these supplied, the project will post your update to Twitter, so head over and check that it has worked.

Sending an image is made easier via a GUI interface that enables you to select the file that you wish to send. Once selected, it saves the absolute path to the file.
Extension activity
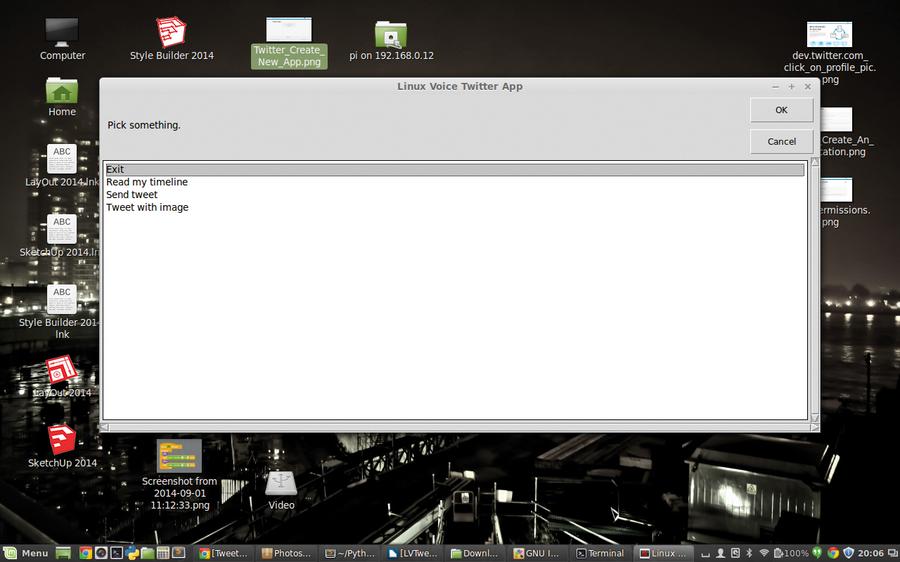
Following these steps, we’re managed to make two scripts that can read our timeline and print the output to the shell, but we can also merge the two together using an EasyGUI menu and a few functions. The code for this activity is available via the GitHub repository, so feel free to examine the code and make the application your own.
Related Posts


About The Author
Les Pounder
Les Pounder is a maker and hacker specialising in the Raspberry Pi and Arduino. Les travels the UK training teachers in the new computing curriculum and Raspberry Pi.