AsmSchool: Conditions, loops and libraries
Part 2: Start to write full programs and create your own library of useful subroutines.
Why do this?
- Learn what compilers do behind the scenes.
- Understand the language of CPUs.
- Fine-tune your code for better performance.
Last month we took our first steps along the path of assembly language programming, and saw that it’s not as daunting as you might imagine. Yes, it feels rather alien when compared with high-level languages, and you don’t have lots of fancy data types and levels of abstraction to protect you from juggling memory directly. But that’s what we love about assembly – it’s a very pure form of coding, letting you speak to the CPU and operating system directly, without all that other fluff getting in the way. This issue we’ll look at program flow, including loops and conditions, to help you create more powerful programs. We’ll also show how to make your own subroutines to automate common tasks, and build up a library of useful code chunks that you can use in other programs. So, dim the lights, choose a retro green-on-black theme for your terminal emulator, and let’s start hacking like in the good old days…
Reuse code with routines
It’s perfectly possible to make modular and reusable code in assembly language. You have to be careful that you don’t overwrite data used elsewhere in the program, but with the right approach you can create little black-box routines that you write once and never have to delve into again – you just call them when needed. For instance, in last month’s program we used the kernel to print a text to the screen. If your program does lots of text printing, it could be a chore (and a waste of space) to set up the registers each time – if you remember, you have to put the system call number in eax, the output stream in ebx, the length in edx and so forth.
So let’s move the string printing code into its own subroutine that we can call whenever we want. But! Let’s also make it easier to use, in that we don’t even need to specify the length of the string in the edx register. Our new subroutine can work that out itself.
First of all, create a variant of last month’s sample program like this, and save it as test.asm:
section .text global _start _start: mov ecx, mymsg call lib_print_string mov eax, 1 mov ebx, 0 int 80h section .data mymsg db ‘Pretty cool, huh?’, 10, 0 %include “lib.asm”
This is similar to last month’s code, but the string printing part has changed. Instead of setting up all the registers and calling int 80h, we just put the string location in ecx and then “call” a subroutine called lib_print_string. A “call” is a bit like a GOSUB in the basics of yesterday – it hands control to another routine, which will do its work and then return back into the main program.
Now, whereabouts does this lib_print_string routine live? Well, we haven’t written it yet, but we’re going to place it in lib.asm, another assembly language source file. In the listing above, you can see the %include line at the bottom, which simply adds the contents of
lib.asm to the current code listing during the assembly phase. So, you can write commonly accessed routines in lib.asm and keep them separate, without them clutting up the main part of your program.
Another important thing to note here is the string of bytes next to the mymsg label. This time, as well as appending a 10 for a newline character, we’ve also added a zero. This turns it into a “null-terminated string” – and we can look for this zero in our code to determine the string length.
Our lib.asm library will grow to be a useful resource of code snippets, such as number-to-string conversion.
Building up the toolbox
Let’s create the lib_print_string routine. This is longer and more complicated than the process we used last month, which may leave you thinking: what’s the point? Why not just do it manually each time? Well, if you end up with a large program that has hundreds of string-printing parts, the overall code will be smaller if you use the same subroutine each time, rather than setting up all the registers manually. And as we mentioned earlier, this routine can work out string lengths too.
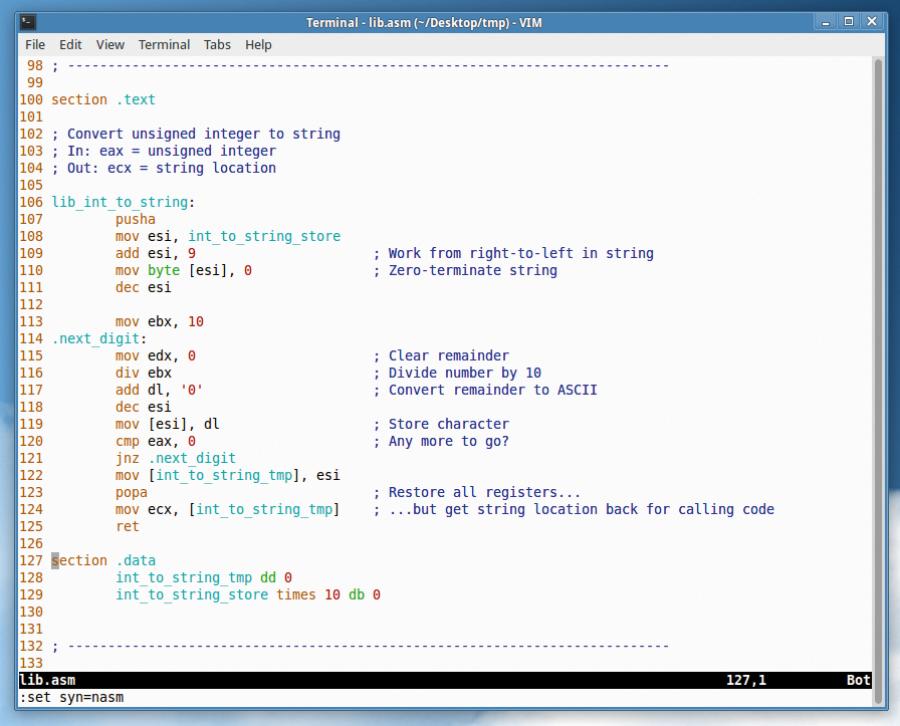
Put this code into lib.asm (you’ll also find it in
www.linuxvoice.com/code/lv013/lib.asm with some other routines you may find useful):
section .text ; Print text string ; In: ecx = string loc ; Out: Nothing lib_print_string: pusha ; Save all regs mov eax, ecx ; Save ecx for later mov edx, 0 ; Character counter .loop: cmp byte [eax], 0 ; Is it zero? je .done ; Jump ahead if so inc edx ; Increment counter inc eax ; And string loc jmp .loop ; And carry on .done: mov eax, 4 ; sys_write mov ebx, 1 ; stdout int 80h ; Call kernel popa ; Restore all regs ret ; Back to caller
There’s quite a lot going on here, but it introduces various new concepts such as loops and conditionals, so we’ll go through it carefully. One important point to note at the start: semi-colon characters are used to denote comments, so anything after them (until the end of the line) will be ignored by NASM. In assembly language, it’s a very good idea to be verbose with your comments, otherwise you may come back to the code in several months and be completely bamboozled.
So, we start this off by telling NASM that the following code should be in the “text” section of the resulting binary file – that is, executable code and not data. Then we have three lines of comments, saying what the subroutine does, which registers it uses, and which registers it changes when it exits. We can see here that our lib_print_string routine just needs the string location in ecx, and doesn’t change anything else – the registers will remain the same when control is handed back to the main program.
Other registers
Along with the four main general-purpose data registers, eax, ebx, ecx and edx, there are a few more that are worth knowing about. Two are used primarily for string handling: esi and edi. The first can be used as a “source index” for strings – ie a pointer to a position inside a string that’s being read from – while the latter is a “destination index” for storing data. Consider this code:
mov esi, mystring
mov edi, blankstring
lodsb
stosb
Say that mystring points to a string containing “Hello” here, and blankstring just to a series of zeroed-out bytes. The lodsb instructions retrieves a byte from the location esi points to, storing it in eax (specifically, the al byte portion of that register), and then the stosb instruction stores the byte in ah at the position pointed to by edi. So it copies “H” from one string to another. But! To make string handling even easier, lodsb automatically increments the esi register each time by a byte (thereby pointing it to the next character), and stosb does the same thing for edi.
Meanwhile, the esp register points to the current location on the stack. This moves around as you push items onto it and pop them off. The eip register is the “instruction pointer” – it simply points to the current instruction in the code. This is changed when you do a jmp or call operation. And then there’s the EFLAGS register, also known as the status register, which has various bits set to show the results of operations (eg whether the result was zero, or there was an overflow). This is used by many conditional instructions.
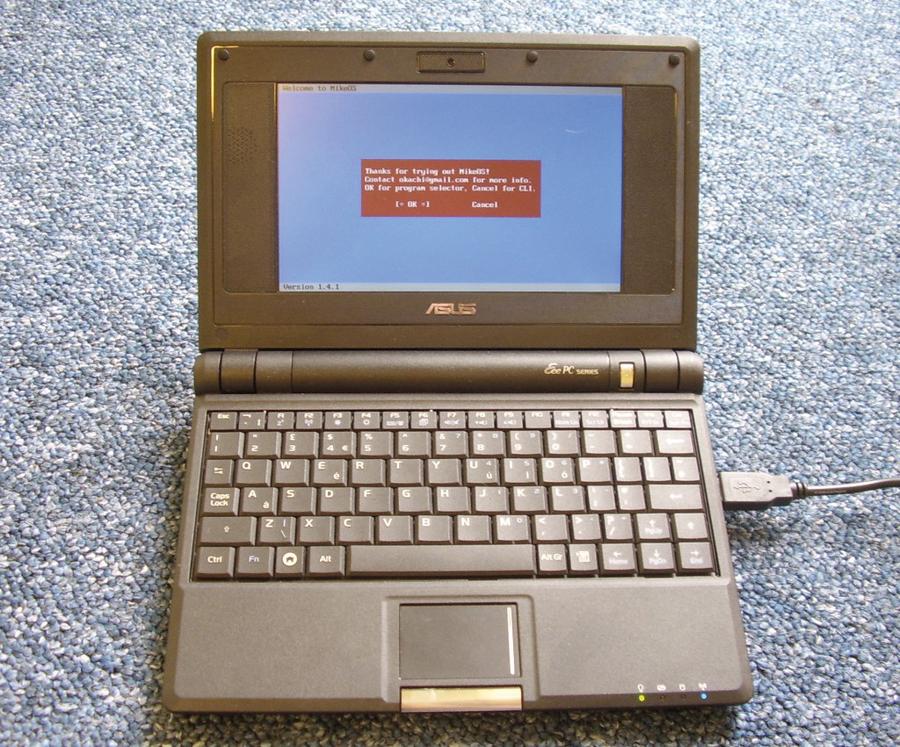
In the next couple of issues, we’ll prepare for running code on bare hardware – no OS required!
What is hexadecimal?
We use the base 10 (decimal) number system because that’s how many fingers we’ve got, so it’s useful for counting. But it doesn’t make much sense in terms of a CPU, so in low-level programming you’ll often see base 16 instead – aka hexadecimal. This takes some time to get your head around if you’ve never used it before, but after a while you can switch your brain into hex mode.
Like decimal, hex digits go from 0 to 9. But for 10 decimal, hex switches to A and then counts up to F (15 decimal). Then, for 16 decimal, it carries over – 10 in hex. Makes sense? This chart should help:
Hexadecimal 19 is followed by 1A, and FF is followed by 100, and so forth.
Dec:1 2 3 4 5 6 7 8 Hex:1 2 3 4 5 6 7 8 Dec:9 10 11 12 13 14 Hex:0 A B C D E Dec:15 16 17 18 19... Hex:F 10 11 12 13...
Loops and conditionals
The first instruction in the previous block is “pusha”, which means “push all registers onto the stack”. You may remember the stack from last issue: it’s a temporary storage space where you can place register contents when you need to use those registers for something else. We push all of the registers on to the stack at the start of the subroutine, do our own work with them, and then pop them all back off (with popa) just before we return back to the main code (with ret). This means that the calling program doesn’t need to save the registers – it assumes they will be in the same state after the subroutine has been executed.
Now, the string location has been provided in the ecx register, but we want to keep that for later. We need to count the characters in the string though, so we copy ecx into eax and work with the former, leaving the latter well alone. We’re going to go through the string until we find a zero byte (remember, we’re using zero-terminated strings), counting up along the way to determine the string length. And the counter we’re going to use is the edx register. In pseudocode:
10 Look at byte in string 20 Is it a zero? 30 If yes, exit the loop 40 If not, increment the counter and string position 50 Goto 10
Our loop begins with the .loop label, and the period at the start means that it’s a local label. In other words, it expands to lib_print_string.local. Why do we need this? Well, it means we can use .loop as a label in other routines, which is very handy – otherwise you’d need to come up with a different name each time. Of course, you can still only have one instance of .loop under each parent label.
So, we have the string position in eax. The first thing we do is to get a byte from the string like so:
cmp byte [eax], 0
The cmp instruction means “compare one number (or register) with another”, and the square brackets are extremely important here. They mean: don’t compare the number inside eax to zero, but the byte inside the memory location that eax points to. You see, eax will contain a big number pointing to a string somewhere in memory, like 2187612. We’re not interested in that location, but we’re interested in the exact byte stored inside that location, which is why we’re using the square brackets. So here we’re comparing a byte in the string to zero. The next line, je .done, is a conditional jump operation: it says, “if the numbers are equal, jump to the specified point in the code”. There are other conditional jump operations that you can do after a cmp, such as jg (jump if first number is greater than second), which works with signed numbers, or ja (jump if above) which works with unsigned ones. We’ll look at these in more detail next month.
Back to the code: if the byte from the current position in the string (pointed to by eax) is zero, it means it’s the end of the string, so jump ahead to the .done label. But if it’s not zero, the lines ahead of the je instruction are executed instead. First we increment edx, our counter, by one byte, and then we increment eax so that it points to the next character in the string. Then we jump back up to our .loop label, and perform the next comparison.
Do more with less
As we’ve mentioned before, this is exactly how CPUs work: they move numbers around between memory and registers, perform calculations on them, and then jump to different parts of the code accordingly. Assembly language is actually very simple in some ways – it just takes time to build up advanced functionality from a relatively small set of instructions. Look at Elite, the 8-bit space trading classic, for instance: it was originally written for a CPU (the 6502) that had only 56 instructions. Yet with this small range of instructions, it’s possible to create a complete 3D engine and an absorbing game around it!
Anyway, at the .done label in our code, we have everything we need to call the kernel. We need to put the value 4 into eax to specify the sys_write kernel routine, and 1 into ebx to print the string to standard output, but we’ve already populated the other registers accordingly. We left ecx alone since the start of the routine, and our loop has calculated the length of the string in edx, so the kernel can use that too! So all we need to do is call int 80h and the job’s a good ’un, as they say.
Then we pop the registers back off the stack, as described earlier, and use ret to return to the calling program. There’s something important to note here: when you “call” a different piece of code, the current location is placed onto the stack for later retrieval. The ret instruction then retrieves that location from the stack and places it inside the eip (instruction pointer) register, so execution continues from the previous point. This is why you have to be careful when managing the stack: if you pop off more numbers than you’ve pushed on, you could end up popping off the return address from a call instruction, and your program will end up executing somewhere else!
You can assemble and link the program with the same instruction as last month:
nasm -f elf -o test.o test.asm ld -m elf_i386 -o test test.o
Then run the program in place with ./test. Yes, it prints a string, just like last month! But it does much more under the hood, and will prepare you for building up a library of useful routines in the future.
You now know how to repeat operations using loops, which is vital in more advanced programs, and you can also perform conditional operations depending on the contents of a register. You can also create your own subroutines to handle common tasks, and make them sufficiently modular that they won’t interfere with the workings of the calling code. (This is why it’s a good idea to use pusha at the start and popa at the end of a subroutine, when the subroutine works with several registers – you can guarantee the calling code that everything will be in the same state when you ret back to it.
Next issue we’ll look at input and handling files, so you’ll be ready to write proper, functional (and blisteringly fast) programs. And we’ll get even closer to the ultimate goal of running code on the bare metal of your PC. See you then…
Do the math
So far we’ve focused on moving numbers into registers, but we can also perform mathematical operations on registers as well. For example, here’s some addition:
mov eax, 10
mov ebx, 15
add eax, ebx
add eax, 7
Remember that operations go from right to left in assembly language (at least, in NASM syntax). So what does eax contain by the end? First of all we place 10 into it, and then 15 into ebx. We add ebx on to eax, so the latter now contains 25. Then we add a number (7) so the result is 32. Subtraction can also use registers and numbers:
mov eax, 100
sub eax, 99
Now eax just contains 1. Multiplication and division work in a slightly different way – you’ll find a lot of these oddities in x86 programming, due to the long history of the architecture! For multiplication, you first need to place a number in eax; then you multiply it using another register. For instance:
mov eax, 10
mov ebx, 5
mul ebx
After this, eax contains 50. Division works in a similar way, with the remainder being stored in the edx register:
mov eax, 10
mov ebx, 4
div ebx
After this, eax contains 2 (as there are two fours in 10), and edx contains 2 as well, as that’s the remainder.
Note that you can’t use lib_print_string to print the contents of registers directly, as they need to be converted into ASCII text format first. This is beyond the scope of this tutorial, but if you download www.linuxvoice.com/code/lv013/lib.asm you’ll see there are two extra routines: lib_int_to_string (which takes a number in eax, and returns the location of a string with the converted form in ecx), along with lib_print_registers, which simply shows the contents of all registers. So, try doing some maths and then:
call lib_print_registers
to see what the results are.
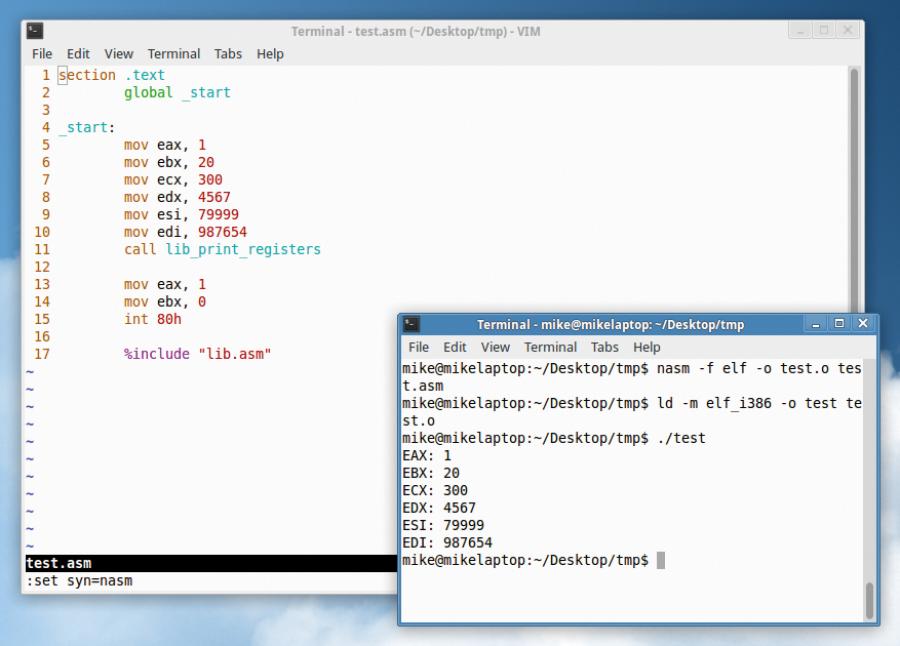
Use lib_print_registers from our lib.asm to quickly view the contents of the main registers.
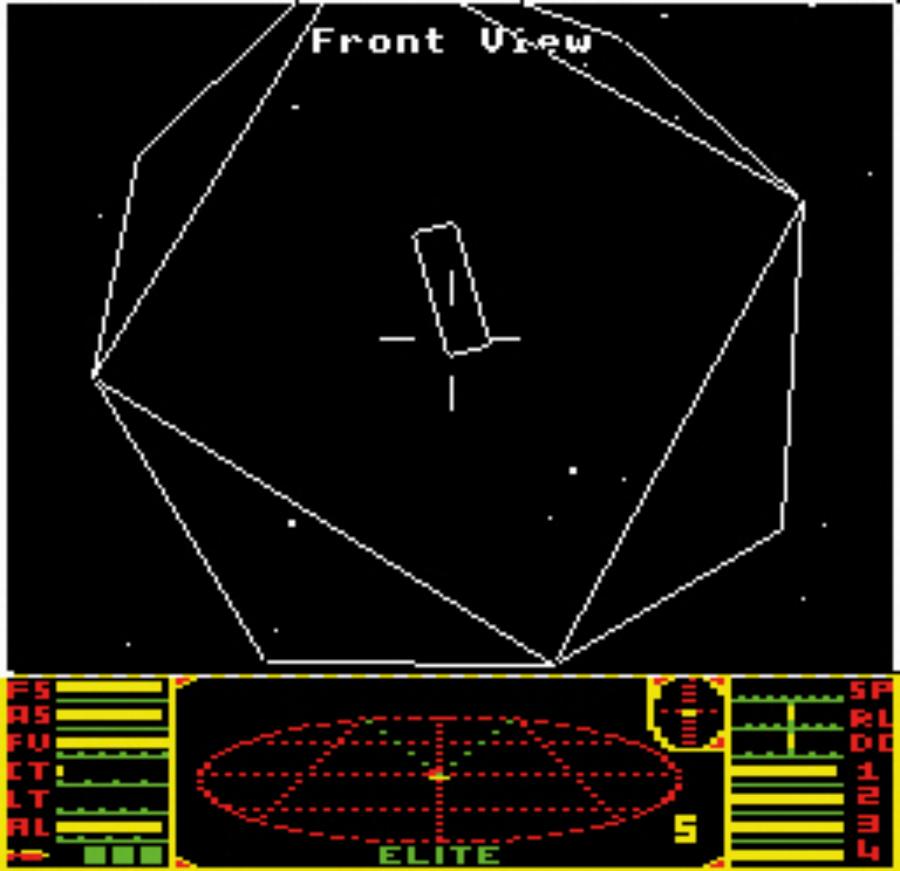
Early CPUs with tiny sets of instructions could still do a lot – look at Elite on the 6502 for instance.
Related Posts


About The Author
Mike Saunders
Mike stores his data by printing out hex dumps and laminating the sheets. He's the author of The Haynes Linux Manual and the creator of MikeOS, an operating system hand-built from assembly language.