AsmSchool: Make an operating system
Part 4: Using the skills you’ve acquired in previous tutorials, you’re ready to make your very own operating system!
WHY DO THIS?
- Learn what compilers do behind the scenes
- Understand the language of CPUs
- Fine-tune your code for better performance
We’ve come a long way in the last few months, starting with very simple assembly language programs for Linux, and finishing last issue with standalone code running on a real PC. But now we’re going to put everything together and make an actual operating system. Yes, we’re going to follow in the footsteps of Linus Torvalds – but what exactly is an operating system? What does it do that we need to recreate?
Here we’ll focus on its core features: loading and running programs. Advanced operating systems do a lot more, such as managing virtual memory and handling network packets, but those require years of effort so we’ll focus on the essentials here. Last month we wrote a small program that fits into the first 512 bytes of a floppy disk (the first sector), and this month we’ll beef it up so that it can load other data from the disk.

Our operating system in action, showing the prompt, a command, and running a program from the disk.
Writing a bootloader
We could try to squeeze our operating system into the first 512 bytes of the floppy disk – ie the chunk that’s loaded by the BIOS – but we wouldn’t have much space to do anything interesting. So instead, we’ll use these 512 bytes for a simple bootloader, which will load a kernel to another location in RAM and then execute it. (Then we’ll set up the kernel to load and execute other programs from the disk – though more on that later.)
You can get the code for this tutorial from
www.linuxvoice.com/code/lv015/asmschool.zip. Here’s boot.asm, our bootloader:
BITS 16 jmp short start ; Jump past disk description nop ; Pad out before disk description %include “bpb.asm” start: mov ax, 07C0h ; Where we’re loaded mov ds, ax ; Data segment mov ax, 9000h ; Set up stack mov ss, ax mov sp, 0FFFFh ; Stack grows downwards! cld ; Clear direction flag mov si, kern_filename call load_file jmp 2000h:0000h ; Jump to loaded kernel kern_filename db “MYKERNELBIN” %include “disk.asm” times 510-($-$$) db 0 ; Pad to 510 bytes with zeros dw 0AA55h ; Boot signature buffer: ; Disk buffer begins
Here, after the BITS directive telling the NASM assembler that we’re in 16-bit mode, the first CPU instruction is jmp. You will recall from last month that execution begins right at the start of the 512 bytes that the BIOS loads from the disk, but we need to jump past a special chunk of data here. You see, for our demo last month, we simply injected the code into the start of the disk (using dd) and left the rest of the disk blank.
This time, we need to use a proper floppy disk in MS-DOS (FAT12) format, and for this to work properly, we need to include some special data near the start of the sector. This is called the BIOS Parameter Block (BPB), and provides detail such as the label, number of sectors and so forth. This doesn’t interest us now, as it’s a topic that warrants its own set of tutorials, so we’ve placed the details in a separate file, bpb.asm.
Now, this line in our code is important:
%include “bpb.asm”
This is a NASM directive, and includes the contents of the specified file inside the current one during assembly. In this way, we can keep our bootloader code neat and tidy, leaving the BPB details in a separate file. The BPB begins three bytes after the start of the sector, and because the jmp instruction only takes up two bytes, we have a “nop” (no operation – an instruction that does nothing but waste CPU cycles) to use up an extra byte.
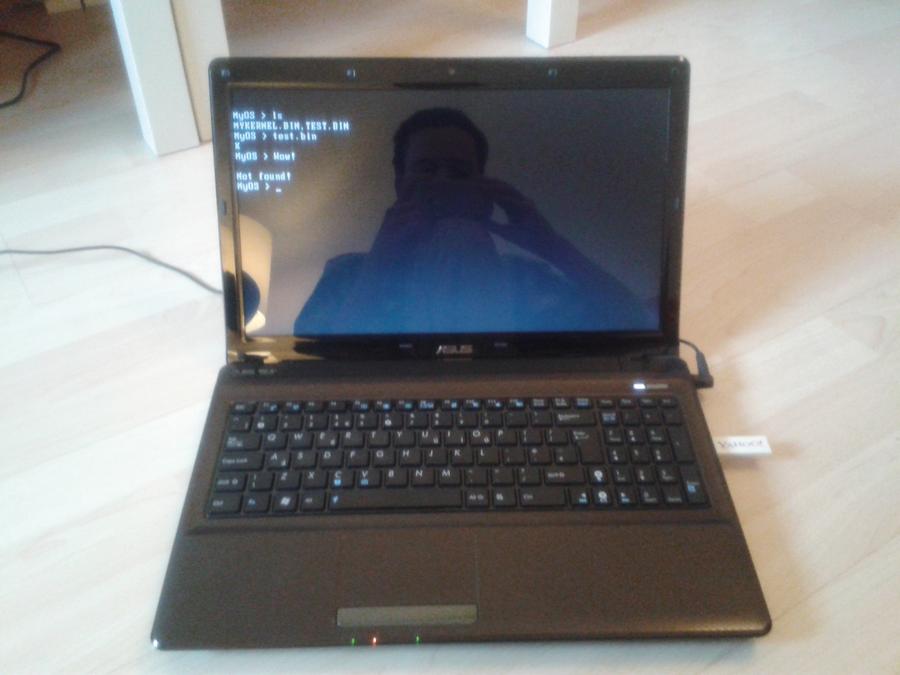
Nothing beats seeing your work (and reflection) running on real hardware – it’s geektastic!
Stack it up
Next up we have the same instructions to set up the data registers and stack, as per last month, along with a cld (clear direction) instruction, which determines that certain instructions such lodsb work forwards during operation, incrementing SI rather than decrementing it.
Next, we place the location of a string inside the SI register and call our load_file routine. But hang on a minute – we haven’t even written this routine yet! That’s true, but this is inside another file that we include, disk.asm.
FAT12, as used on DOS-formatted floppy disks, is one of the simplest filesystem formats in existence but still requires a good deal of code to parse. The load_file routine is around 200 lines long, and as we’re focusing on OS development here and not specific filesystems, we didn’t want to print it in the magazine and waste space. So, we include disk.asm near the end of our code, and can forget about it. (If you’re interested in exploring FAT12, however, see http://tinyurl.com/fat12spec for a good overview, and then have a nosey around inside disk.asm – the code is well commented.)
Anyway, the load_file routine loads the filename specified in the SI register to segment 2000, location 0, so we then jump to that code to execute it. That’s
it – the kernel is loaded, and the bootloader has done its job!
You’ll notice that the kernel filename in our code is MYKERNELBIN and not MYKERNEL.BIN as you might expect in the old 8+3 filename scheme of DOS floppy disks. That’s just the way it works internally in FAT12, and we save space here by making sure our load_file routine doesn’t have to parse out the full stop and convert the filename to the internal format.
After the line that includes disk.asm, we have the two lines that pad out the boot loader to 512 bytes and include a signature (as explained last month). Finally, we have a label called “buffer” which is used by the load_file routine. Essentially, load_file needs an empty space of RAM to do some temporary work when finding a file on the disk, and we have plenty of free space after where the boot loader is loaded, so we just place the buffer there.
To assemble the bootloader, use:
nasm -f bin -o boot.bin boot.asm
Now we want to create a virtual floppy disk image in MS-DOS format, and inject our bootloader into the first 512 bytes like so:
mkdosfs -C floppy.img 1440 dd conv=notrunc if=boot.bin of=floppy.img
And we’re done! We now have a bootable floppy disk image that will load mykernel.bin and execute it. Next up is the fun part – writing a kernel…
Kernel time
We want our kernel to perform a handful of essential tasks: print a prompt, take input from the user, see if it’s a command, or execute another program on the disk if specified. Here’s the code, as provided in mykernel.asm:
mov ax, 2000h mov ds, ax mov es, ax loop: mov si, prompt call lib_print_string mov si, user_input call lib_input_string cmp byte [si], 0 je loop cmp word [si], “ls” je list_files mov ax, si mov cx, 32768 call lib_load_file jc load_fail call 32768 jmp loop load_fail: mov si, load_fail_msg call lib_print_string jmp loop list_files: mov si, file_list call lib_get_file_list call lib_print_string jmp loop prompt db 13, 10, “MyOS > “, 0 load_fail_msg db 13, 10, “Not found!”, 0 user_input times 256 db 0 file_list times 1024 db 0 %include “lib.asm”
Before we go through this, note that the final line includes lib.asm, which is also provided in the asmschool.zip bundle on our website. This is a library of useful screen, keyboard, string and disk routines that you can use – and in this case, we tack it onto the end of our code, to keep our main kernel code small and sweet. See the boxout for more information on the routines provided in lib.asm.
So, in the first three lines of our kernel we set up our segment registers to point to the segment in which we were loaded – 2000. This is important to make sure that instructions like lodsb work properly, reading from the current segment and not somewhere else. We’re not going to do anything else with segments after this point, though; our operating system will do everything in 64k of RAM!
Next up, we have a label that marks the beginning of a loop. First of all, we use one of the routines in
lib.asm, lib_print_string, to print a prompt to the screen. The 13 and 10 bytes before the prompt text are newline characters, so that the prompt isn’t printed directly after the output of any program, but always on a new line.
Then we use another lib.asm routine, lib_input_string, which takes keyboard input from the user and stores it in the buffer pointed to by the SI register. In our case, the buffer is defined near the bottom as:
user_input times 256 db 0
This defines a buffer of 256 zeroed-out bytes – surely enough for a command line on a simple operating system like ours!
Then we perform a check on the input. If the first byte in user_input is zero, then the user pressed Enter without typing anything; remember that strings are terminated by zeros. So if this happens, we just jump back up to the loop and print the prompt again. If the user has entered something, however, we first do a check to see if they typed ls. So far, you’ve seen that we’ve done comparisons on bytes in our assembly programs, but it’s also possible to perform comparisons on double-byte values – aka words. Here, we compare the first word stored in user_input with ls, and if so, jump to a chunk of code below. In that chunk, we use another lib.asm routine to get a comma-separated list of files from the disk (which we store in our file_list buffer), print it to the screen, and go back to the loop for more input.
Take a load off
If the user hasn’t entered ls, we assume they’ve entered the name of a program on the disk, so we try to load it. Our lib.asm file includes a handy lib_load_file routine that does all the hard work of parsing the FAT12 tables on the disk: it takes a filename string location in AX, and a position to load the file in CX. We already have the user input in SI, so we copy that into AX, and then we put 32768 in CX as the loading point.
But why this point specifically? Well, it’s just a design choice in the memory map of our operating system. Because we do everything inside a 64k segment, and our kernel is loaded at position 0, we might as well use the first 32k for the kernel, and the second 32k for programs that we load. So 32768 is the halfway point in our segment, and gives plenty of room for both the kernel and programs.
Now, the lib_load_file routine does something important: if it can’t find the file on the disk, or has some kind of problem reading the disk, it will quit out and set the carry flag. This is a status flag on the CPU that is set during certain math operations, and doesn’t interest us here – but we can use the presence of the flag to perform quick decisions. If lib_load_asm has set the carry flag, we jc – jump if carry – to a chunk of code that prints an error message and then returns to the loop.
If the carry flag hasn’t been set, however, then lib_load_asm has successfully loaded the file to 32768. So all we need to do now is call that location, to run the program we loaded! And when that program uses ret (to return to the calling code), we simply continue the loop. That’s it – a very simple command parser and program loader, in just 40 lines of assembly, admittedly with plenty of help from
lib.asm.
To assemble the kernel, use:
nasm -f bin -o mykernel.bin mykernel.asm
After this, we need to add mykernel.bin to the floppy disk image somehow. If you’re familiar with loopback mounting, you could access floppy.img that way, but a simpler approach is to use the GNU Mtools (www.gnu.org/software/mtools). This is a suite of programs for working with MS-DOS/FAT12 formatted floppy disks, and it’s available in the package repositories of all major distros, so grab it with apt-get, Yum, Pacman or whatever your distro uses.
Then add mykernel.bin to floppy.img like so:
mcopy -i floppy.img mykernel.bin ::/
Note the funny bits at the end here: colon, colon, slash. Now we’re almost ready to go, but what fun is an operating system if it doesn’t have any programs to load? Let’s fix this by writing a really quick one. Yes, you are now going to write software for your own OS – think of the geek points you’re earning. Save this as test.asm:
org 32768 mov ah, 0Eh mov al, ‘X’ int 10h ret
This simply uses the BIOS to print the letter ‘X’ to the screen, and then returns to the calling code – in this case, our operating system. The org bit at the start isn’t a CPU instruction but a directive to NASM, telling it that the code will be loaded at 32768, so it should calculate offsets accordingly.
Assemble it and add it to the floppy image thusly:
nasm -f bin -o test.bin test.asm mcopy -i floppy.img test.bin ::/
Now take a deep breath, prepare for awesomeness, and boot the disk image in a PC emulator like Qemu or VirtualBox. For instance:
qemu-system-i386 -fda floppy.img
Et voilà: the boot.bin bootloader that we injected into the first sector loads mykernel.bin, which then presents you with a prompt. Enter ls to see the two files on the disk (mykernel.bin and test.bin), and enter the latter filename to run it and display the letter X.
How cool is that? Now you can begin customising your operating system’s command line, add other commands, and add more programs to the disk. To try it on a proper PC, see the “Running on real hardware” boxout in last month’s tutorial – the commands are exactly the same. Next month we’ll make our OS more powerful by letting loadable programs use system routines, thereby sharing code and reducing duplication. Much winning awaits.
The OS we’ve made is like a very simple version of MikeOS (http://mikeos. sf.net), so see its code for inspiration.
Routines in lib.asm
As mentioned, lib.asm provides a bunch of useful routines to use in your kernel and standalone programs. Some of these use instructions and concepts that we haven’t touched on in this tutorial series yet, and others (like the disk ones) delve into the world of filesystems, but if you’re feeling confident you could have a peek inside and see how they work. Most importantly, though, here’s how to call them from your code:
- lib_print_string Takes the location of a zero-terminated string in the SI register and displays it.
- lib_input_string Takes the location of a buffer in SI, and fills it with keyboard input from the user. When the user hits Enter, the string is zero-terminated and control returns to the calling program.
- lib_move_cursor Moves the cursor on the screen to the positions in the DH (row) and DL (column) registers.
- lib_get_cursor_pos Call this to get the current row and column in DH and DL respectively.
- lib_string_uppercase Takes the location of a zero-terminated string in AX, and converts it to uppercase.
- lib_string_length Takes the location of a zero-terminated string in AX, and returns its length in AX.
- lib_string_compare Takes locations of two zero-terminated strings in SI and DI, and compares them. Sets the carry flag if the same (for jc instructions), or clears if different (jnc).
- lib_get_file_list Takes a buffer in SI and populates it with comma-separated, zero-terminated list of filenames on the disk.
- lib_load_file Takes AX as filename and loads it to position CX. Returns BX containing number of bytes loaded (ie the filesize), or carry set if file not found.
Try including lib.asm in your standalone programs (eg at the end of test.asm) and see what you can do.
There’s lots of useful stuff in lib.asm – have a good look around inside.
Mike Saunders has written a whole OS in assembly (http://mikeos.sf.net) and is contemplating a Pi version.
Related Posts


About The Author
Mike Saunders
Mike stores his data by printing out hex dumps and laminating the sheets. He's the author of The Haynes Linux Manual and the creator of MikeOS, an operating system hand-built from assembly language.