Create a Firefox add-on for fun and profit
Why do this?
- Create more features for Firefox to improve your web browsing.
- Find out who’s tracking your browsing habits.
- Package your software for a platform that’s used by more than 450 million people around the world.
Since this article was first published, Mozilla have changed their approach to add on security. Newer versions of Firefox won’t load addons unless they’re signed by Mozilla, so you’ll only be able to follow this tutorial if you’re using an older version of Firefox (42 or before), or if you’re using the developer or nightly edition of Firefox. There’s more information about this on the Mozilla website at https://wiki.mozilla.org/Add-ons/Extension_Signing.
Firefox is a great web browser, but there are times when you want a little more functionality than it provides by itself. For these occasions, you can use add-ons to power-up the browser
Like most web technology, Firefox’s addons are written in JavaScript, CSS and HTML. So, if you know how to create a web page, you know how to create a Firefox add-on. All you have to do is package it in the right way.
Mozilla provides all the tools you need for this in the add-on SDK. You can grab this from https://add-ons.mozilla.org/en-US/developers/builder.
Unzip this and move into the directory in creates:
unzip add-on-sdk-1.17.zip
cd add-on-sdk-1.17
You should then be able to start the SDK with:
source bin/activate
This expects Python to default to Python 2, which is the case in most Linux distros. However, if you’re using a bleeding-edge distro such as Arch, it may point to Python 3 instead. If you get a Python error, this is probably what caused it. You can solve this by changing the first line of the cfx file in the bin subfolder to:
#! /usr/bin/env python2
It will still output a warning, but should work fine.
We also require the Bash shell. Again, this is the default in most Linux distros, but if you’re using a different shell, switch to Bash for this session.
The main.js file is where you define how your add-on will
work, but in our case, most of the processing is done in
trackers.js.
Once you’ve run this command, you should notice that your command line prompt has changed. This tells you that the SDK is now running. It isn’t permanent, so every time you start a new shell, you’ll have to re-run source bin/activate to start the SDK again. If you’re going to be doing a lot of add-on development, you could add this to your Bash profile to run it automatically when you start.
The SDK works on a directory basis, so you’ll need to create a new directory for your add-on. This can be anywhere. Once you’ve created a new directory, cd into it using your shell with the SDK active and run:
cfx init
This will create the directory structure and files you need for an add-on. There should now be subdirectories called data, lib and main, and a file called package.json. From this directory, you can also use the cfx tool that’s part of the SDK to launch Firefox with your add-on enabled:
cfx run
This won’t interfere with your normal Firefox session, so you can still use that to browse normally while using this second Firefox instance for testing your plugin.

Twitter lets Google track users as they view tweets through Google’s Analytics.
Our top five add-ons
Ghostery is like a super-charged version of the add-on created in this tutorial. It also gives you the ability to block trackers, and gives you more details about some of them. However, it doesn’t give details on all servers that can see your web traffic like ours does (https://add-ons.mozilla.org/en-US/firefox/add-on/ghostery).
Firebug is the most popular add-on for web developers. It adds a host of features to Firefox’s already impressive developer’s toolset (https://add-ons.mozilla.org/en-US/firefox/add-on/firebug).
NoScript Security Suite gives you fine-grained control over what type of scripts which sites can run. This can increase your security, privacy and browsing speed (https://add-ons.mozilla.org/en-US/firefox/add-on/noscript).
Leech Block If you’re anything like us, you’re easily distracted by the web, and can lose hours of productivity on some sites. Leechblock is an add-on to force you to get off those sites and back to work. (https://add-ons.mozilla.org/en-US/firefox/add-on/leechblock).
LastPass helps you remember secure passwords to your online accounts. (https://add-ons.mozilla.org/en-US/firefox/add-on/lastpass-password-manager).
Start coding
Let’s now start making an add-on. Our simple test add-on will track which companies are tracking you as you browse the web. Every time you load a website, you download the text, scripts and images separately, often from different servers. With every server you download one of these items from, you reveal your browser’s location. Lots of companies exploit this to try and track people as they move around the web then use this data to target advertising. We’ll turn this around, and get data about who’s tracking us.
The first JavaScript file that Firefox loads is
lib/main.js. The SDK creates this when it initialises the directory, but it leaves it blank. Typically, this file is just used to load the appropriate parts of the SDK, then hand off to other JavaScript files that are in the data directory.
For our add-on, we’ll need the tabs section of the SDK, which enables us to interact with the web pages the user is viewing, and the self section, which just lets us load additional scripts. Add the following to
lib/main.js:
var tabs = require(“sdk/tabs”).on(“load”, runTracker);
var self = require(“sdk/self”);
function runTracker(tab) {
tab.attach({contentScriptFile: self.data.url(“tracking.js”)});
}
This attaches data/tracking.js to pages as they are loaded. The terminology here is a little confusing. The tabs part of the SDK is used for interacting with web pages rather than the actual tabs on the browser.
In this case, attaching a script means injecting it into the page and running it. This script could do anything that a script in the page could do. That includes things like manipulating the page, inserting or removing elements from the page and sending data to remote servers.
It’s in the tracking.js file that we’ll do all the work, so create this as an empty text file in the data directory.The first thing we need to do is create an area where we can display information to the user. There are many ways to do this, but we’ll use a JavaScript alert. This is a simple pop-up that will spring up every time a page is loaded. Our tracking.js code for this is:
alertText=”Who’s Watching you visit this page?n”
// add details of who’s watching
alert(alertText);
We just need to replace the comment line with code that actually locates the various people tracking us.
To do this, you need to get the URL of every element on the page, then loop through these and extract just the domains, then assemble a list of the domains. You can do this with the following code:
// add details of who’s watching
var spyElements = document.querySelectorAll(‘img, script’)
var domains = [];
for(var i = 0; i < spyElements.length; i++) {
try {
var domain = new URL(spyElements[i].src).hostname;
}
catch(err) {
domain = null;
}
if(domain && domains.indexOf(domain)==-1 ) {
domains.push( domain );
alertText += domain + “n”;
}
}
//sort by type
The document.querySelectorAll() function is used to get an array of all the images and scripts on the page. We can get the source (src) of these, and from this we need to get the hostname.
There are a few ways of extracting the hostname from a string in JavaScript, but the easiest is just to try and make a URL out of it. If the src doesn’t have a hostname, this will throw an error, so we put this line in a try block to catch the error. If it does throw an error, we can safely ignore that element because it will be on the same host as the main file and therefore can’t be used to track us.
The if statement checks that the variable domain isn’t null, and that it isn’t already in the domains array (we don’t want to report each domain more than once). If the domain passes this test, we add it to the domains array, and add it to the string that is displayed on the screen.
You can test this out by saving the above to tracking.js, then running cfx run in the root directory of the add-on. You should now be able to browse the web and see who’s spying on you.
The popular Firebug add-on gives web developers extra power for debugging web pages.
Google Chrome
Most major web browsers allow users to extend their functionality in one way or another. In Google’s popular Chrome browser, this is done through extensions. In many ways these are very similar to Firefox add-ons. They’re also written in HTML, CSS and JavaScript, and also defined by a JSON file. However, there are different methods available to you to interact with the browser. If you want to develop for Chome, you’ll find all the information you need to get started at https://developer.chrome.com/extensions.
The Opera web browser is now based on Chromium, so extensions work in much the same way as with Google’s browser. Opera has one additional API for interacting with the Speed Dial (https://dev.opera.com/extensions/speeddial.html).
Let’s tidy it up a bit
This works, but it’s not a very friendly way of outputting the information. After all, domain names may not mean all that much to you. Unless you happen to know who a particular domain belongs to, and what they use it for, you can’t know if there’s a problem or not.
The next part we’ll add will sort out some of the most popular domains. We’ll split them up into Advertisers (companies that make money out of selling advertising), Trackers (companies that make money out of profiling people’s browsing habits), and Others (domains we haven’t been able to classify).
First we need to set up the data:
var advertisers = “”;
var others = “”;
var trackers = “”;
var found = false;
var knownDomains = [[‘google’, ‘Google’, ‘Ad’],
[‘doubleclick’, ‘DoubleClick(Google)’, ‘Ad’],
[‘facebook’, ‘Facebook’, ‘Ad’],
[‘adnxs’, ‘AppNexus’, ‘Tr’]];
Here, we’ve just included four domains to keep the code short, but we could easily include as many as we know about.
The next thing we need to do is loop through the domains we’ve found, and for each one, we’ll put an entry in either advertisers, others or trackers. Put the following code at the bottom of tracking.js.
for(var i=0; i<domains.length; i++) {
found = false;
for (var j=0; j<knownDomains.length; j++) {
if (domains[i].indexOf(knownDomains[j][0]) > -1) {
found = true;
if (knownDomains[j][2] == ‘Ad’) {
if ( advertisers.indexOf(knownDomains[j][1]) == -1) {
advertisers += knownDomains[j][1] + “, “;
}
}
else {
if (trackers.indexOf(knownDomains[j][i]) == -1) {
trackers += knownDomains[j][1] + “, “;
}
}
}
}
if (found == false) {
others += domains[i] + “, “;
}
}
alertText += “n**Advertisers**n” + advertisers +
“n**Trackers**n” + trackers + “n**Others**n” + others;
alert(alertText);
This does everything we need, so you can test it with cfx run.
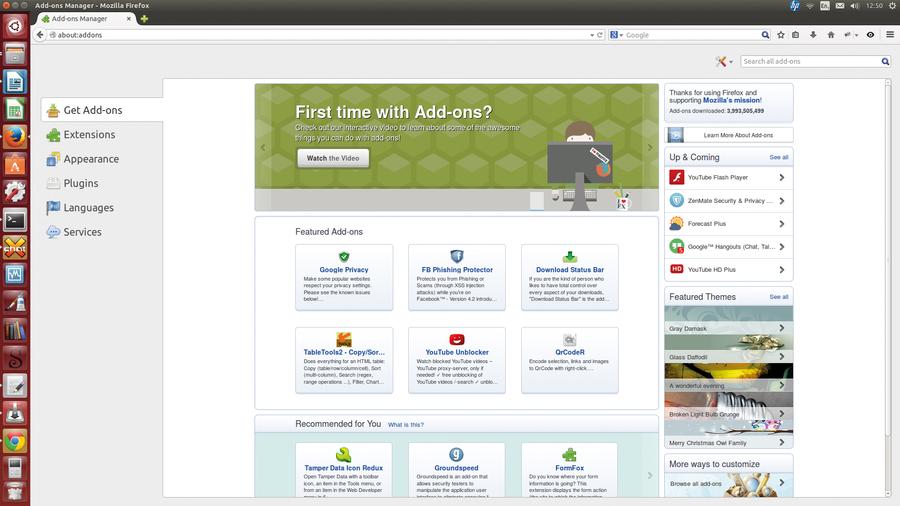
You can find loads of other add-ons by pointing your browser to about:add-ons. See boxout for our recommendations.
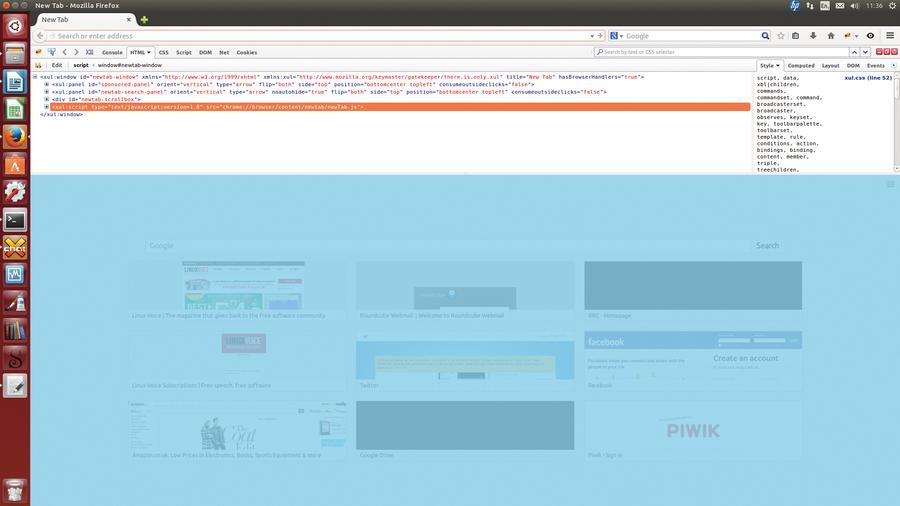
Themes
Themes are another form of Firefox add-on. They don’t add any functionality, but they do make the interface look better (or at least different). The simplest way of creating a theme is with a lightweight theme. These don’t have as much scope as full themes, but they also don’t require any coding. You just select the images you want and fill in a few details. There’s information on getting started with this at https://add-ons.mozilla.org/en-US/developers/docs/themes.
Complete themes allow you to interact with the interface XUL (an XML grammar that controls the layout) using CSS. This way you can modify the GUI in far more ways than adding simple images, however, it is more involved than a lightweight theme. You can find out more at https://developer.mozilla.org/en-US/docs/Building_a_Theme.
Getting interactive
At this stage, we have a working add-on that lets you know who’s watching you as you browse online. It could use a little more data on which domains are trackers and advertisers, but otherwise it works. However, it is a little invasive, and when surfing you don’t always want a pop-up on every new page.
Rather than automatically injecting the code into every page, you can add a button that just runs this script on the current page whenever it’s pressed. This enables the user to leave the add-on running, but only see who’s tracking their browsing when they want to.
To do this, we’ll need another API: ui/ActionButton. This puts an icon button in the main bar that you can use. The first thing you need for this is an icon for the button. There are loads of sources of icons around under different licences. We like the eyeball icon from https://www.iconfinder.com/icons/126581/eye_eyeball_view_icon. You’ll need it in sizes 16×16, 32×32 and 64×64 in PNG format. These can all be downloaded from the above website. The icons are by Timothy Miller and released under the Creative Commons Attribution Share Alike licence, so you’re free to use them as long as you credit the creator and release any changes under the same licence.
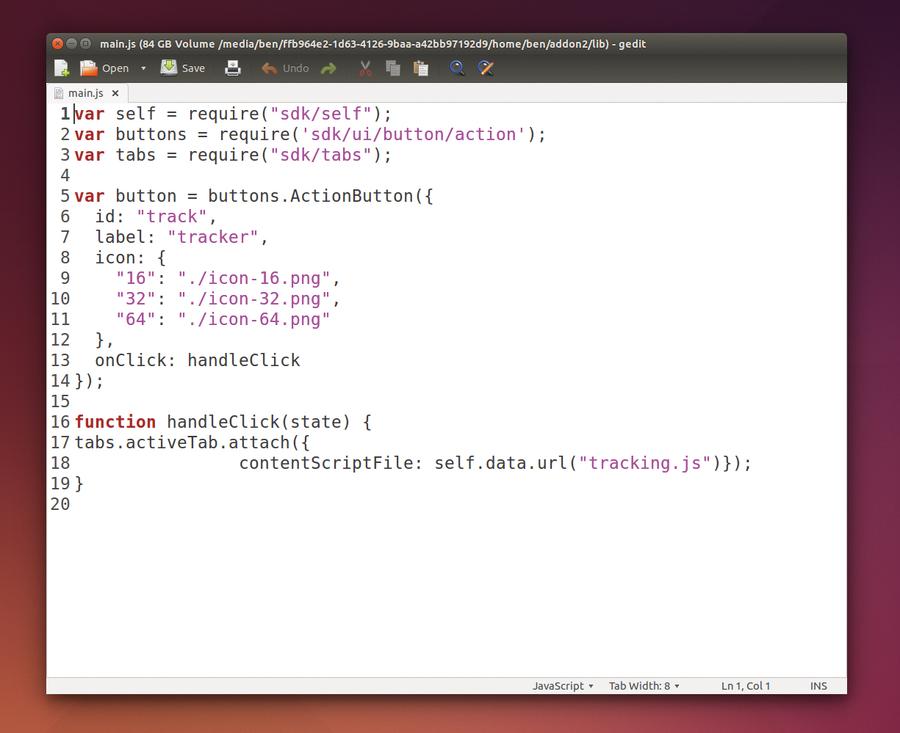
Grab the images, and save them as icon-16.png, icon-32.png and icon64.png in the data folder of your add-on. The button is added in main.js. Change this to the following:
var self = require(“sdk/self”);
var buttons = require(‘sdk/ui/button/action’);
var tabs = require(“sdk/tabs”);
var button = buttons.ActionButton({
id: “track”,
label: “tracker”,
icon: {
“16”: “./icon-16.png”,
“32”: “./icon-32.png”,
“64”: “./icon-64.png”
},
onClick: handleClick
});
To add an action button, all you need to do is bring in the appropriate part of the SDK, then set the button up with an id, label and icon set. The line onclick: handleClick tells the add-on which function we want to run when the user clicks on the icon. This function also needs to be added to the main.js file as well with:
function handleClick(state) {
tabs.activeTab.attach({
contentScriptFile: self.data.url(“tracking.js”)});
}
This uses the same attach() method that we used earlier, but instead of doing it to each tab when they loaded, we do it to the active tab when the button is pressed. With this added, you can use cfx run to start Firefox with the new version, and you should be able to inspect who’s spying you in the currently active tab by clicking on the eye icon.
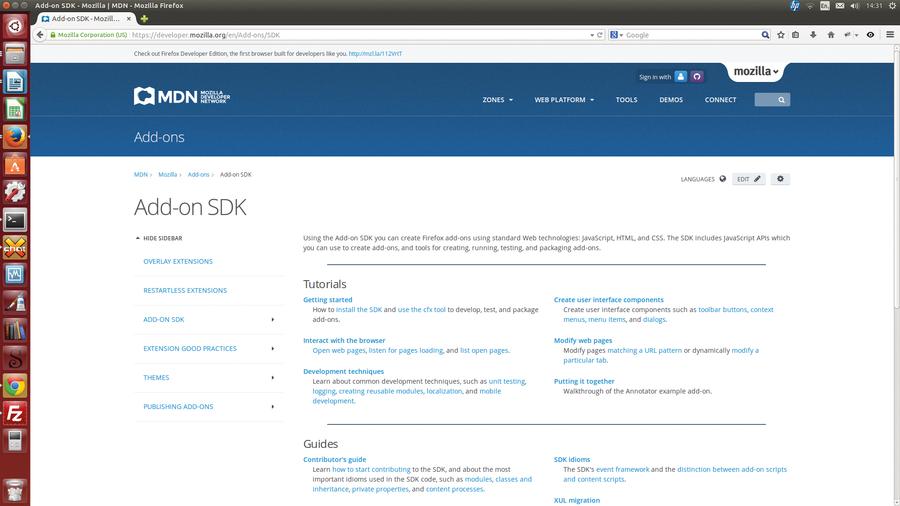
The add-on SDK is well documented at https://developer.mozilla.org/en/Add-ons/SDK.
Packaging our add-on
We’ve now finished coding and the only thing left to do is package the add-on so we can distribute it.
All the information about the add-on is in the packages.json file in the add-on directory. You can edit this to add the appropriate information like this:
{
“name”: “LVPrivacy”,
“title”: “Linux Voice Privacy”,
“id”: “jid1-jBER4uLTx3qzfQ”,
“description”: “See who’s spying on your web browsing”,
“author”: “Ben Everard”,
“license”: “MPL 2.0”,
“version”: “0.1”
}
You can change these for your own add-on.
There are full details about what can go in this file at https://developer.mozilla.org/en-US/Add-ons/SDK/Tools/package_json.
The final thing is to use cfx to package your file as an XPI that can then be installed in Firefox just like any other add-on. This is done with:
cfx xpi
This will create a file with the XPI extension which you can then install in Firefox by going to Tools > Add-Ons > The settings menu in the top right corner > Install Add-On From file.
Useful parts of the SDK API
In our sample add-on, we’ve only interacted with a few parts of the SDK. The full API is far more complete. Here are some of the most useful parts.
add-on-page: This is where you can create an about page for your add-on.
panel: These are like the JavaScript alerts that we used in the sample add-on, but let you include HTML so they are more useful if you’ve got complex information to display, or want to include pictures.
notifications: Another type of pop-up. These are desktop notifications that pop up to alert the user to some event. In Linux, they use libnotify, so the appearance will depend on your desktop environment.
request: This is the API for making HTTP requests. It allows you more control over the request than you would have if you used JavaScript to simply fetch the resource.
simple storage: If you need to store data between browser sessions, then this is the API you need.
tabs: You’ve seen how it can be used to inject scripts into web pages, but this API can also pull information from pages, or interact with them in other ways.
ui: In our example, we used this to add a button to the user interface, but it can also be used to add other things such as a toggle button, a frame, a toolbar or even a whole sidebar.
io/file: As you can probably guess from the name, this is the API for interacting with the filesystem. It allows you far more control than would usually be possible.
Related Posts


About The Author
Ben Everard
Ben Everard is the co-author of Learning Python with the Raspberry Pi and hacks hardware projects held together with a big dollop of Linux and Free Software glue. He's @ben_everard on Twitter.