Create documents with LyX: LaTeX made easy
Explore a way to beautiful documents that doesn’t involve learning a whole set of macro commands.
Why do this?
- Make the Latex learning curve a little shallower
- Produce top-quality prints and slides
- Generate PDFs that look the same on every PC
Back in LV009 we ran a tutorial on the Latex typesetting system. It received some feedback (thanks everyone!), which clearly suggested that a thing named Lyx deserves more than a paragraph in the sidebar. So, here we go.
Lyx is another typesetting system built on Latex. But unlike Latex, you won’t need to learn any markup commands or compile a document just to make sure it looks as intended. Lyx provides a visual environment that even novice office users should be comfortable with. These days, we take for granted that the way a document looks on screen is the way that it’ll look once it’s printed. However, in 1995 when KDE creator Matthias Etthrich conceived the tool that later become Lyx , “What You See Is What You Get” (WYSIWYG) was very much a selling point.
Strictly speaking, Lyx is not WYSIWYG. Described best as an “almost WYSIWYG” or WYSIWYM (What You See Is What You Mean) editor, it provides a point-and-click interface and gives an overall impression of how your document will look. If you need details, you still have to generate a PDF preview, but with Lyx this is no more than one click away. If you ever used a commercial tool like MacKichan Scientific Word, you’ve already got the idea. However, Lyx is free, both as in beer and as in speech.
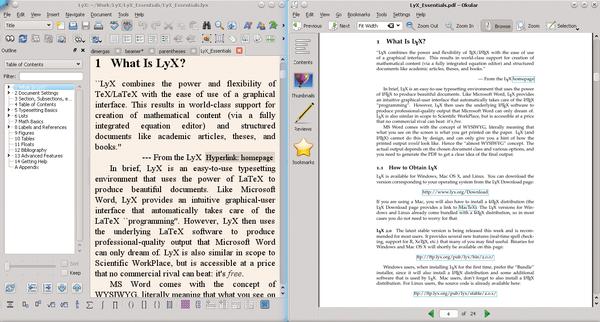
Here’s a Lyx document and a PDF output side-by- side. There are obvious similarities, but not 100% identity.
Bootstrapping
It is fairly simple to install Lyx. From what you already know it should be natural that it requires Qt and Latex – both of these should be available in your package manager. If you still use Windows on some of your machines, download the all-in-one installer from the Lyx homepage (www.lyx.org).
In a nutshell, Lyx provides a convenient way to compose Latex documents. There are lot of the menus, toolbars and suchlike, so you don’t need to remember Latex commands anymore. Having a general understanding of how a Latex document should look is helpful, however. This is akin designing web pages in a visual editor: somewhat faster than manual once you’ve got used to your tool, but having prior experience with raw HTML makes things clearer.
Lyx documents are plain text, and you can work with them in the editor of your choice (albeit there is little point in doing so). Naturally, these documents can be exported to Latex, which comes handy if you want some final polishing. More importantly, you can also import your Latex documents into Lyx. In other words, Lyx is a complement to Latex, not a substitute, and they are interoperable (sort of).
By the time you get to this point, your Lyx packages should have finished downloading (otherwise you may consider ditching your broadband provider). Open the editor from the Applications menu, and let’s type some words.
It’s easy to edit complex formulas with the Math palette.
First steps
As in Latex, Lyx documents consists of environments (distant relatives of Styles in LibreOffice Writer). The basic workflow is as follows: you choose the environment, you type some words, you press Enter when you are done with the passage, and start again. Environments available for use in the document are determined by its class, settable in Document > Settings.
Class is what controls a document’s appearance. Lyx doesn’t really distinguish texts and presentations (you create both in one app). Behind the scenes, Latex lays out the document as an article, a book or a series of slides, taking care of all the formatting itself.
Unless you have special requirements, Lyx generates a PDF. This is a high-fidelity format, so you never need to worry that your presentation will look different on the computer you’ll be giving a talk from. Naturally, you also lose many interactive features like animations, but they seem to be out of fashion these days anyway.
Let’s start your first Lyx document. Give it a name: find a drop-down menu saying “Standard” in the toolbar, open it, select Title and type in something. Now, press Enter (the current environment will change back to Standard) and author something clever and creative, say: “Hello, Lyx!”. Generate a preview: click on the toolbar button with two eyes or press Ctrl+R. Shortly afterwards, you’ll see Evince, Okular or whatever PDF viewer you set as the default displaying the document. The first thing to note here is that Lyx has automatically generated a front page for you, and also given each page a number. You can configure the exact view of the front page in Document > Settings. Some adjustments, like removing the date, are just a matter of checking a box. Others, like changing the page numbering format, may require some Latex code.
There isn’t much point in describing all standard environments here: most of them are self-explanatory and covered well in Essentials of Lyx (http://wiki.lyx.org/uploads/LyX/tutorials/essentials/LyX_Essentials.pdf). Give them a try; for instance, create a bullet or traditional numbered list with Itemize or Enumerate. Toolbar buttons are provided for these to complement the drop-down. The Verbatim option is here for preformatted text (like code samples), and it uses monospace fonts. Alternatively, you can open one of the built-in examples available via the Examples button in the Open Document dialog.
Commenting with Lyx
There are various ways to add comments to your Lyx documents. If you want them visible to your readers, simply insert a footnote via the Insert > Footnote menu or corresponding toolbar button. Notes are numbered automatically, which is convenient if you delete or move them. Another option is a margin note. They appear at the page margin near the text they are attached to (hence the name). Margin notes are unnumbered.
Finally, you may insert yellow Lyx notes. They won’t appear in the final document and are purely for your convenience. Lyx notes are much like comments in programming languages.
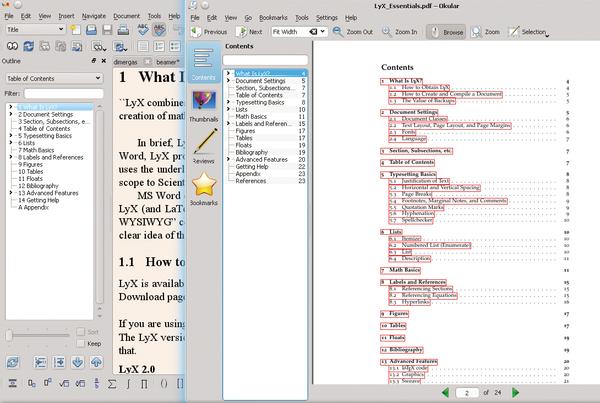
From left to right: the Lyx document outline, PDF outline and the table of contents, all for the same document.
Going further
Lyx is great for structured texts, so let’s create some structure. Again, the options depend on the document. Sections and subsections are usually here, and if you’re writing a book, there should be Chapters as well. Add some division in the usual way and update the preview (use the toolbar button with loop-shaped arrows or press Shift+Ctrl+R). By default, Lyx creates numbered sections. If this is not what you want, use environments that end with an asterisk (like Section*).
A well-structured document is not only good for your readers, it is also easier for you to navigate. Lyx has a document outline pane, but it is hidden by default. Open it via the View menu, and you’ll be able to jump across the text with a single mouse click. This is not to mention that Lyx uses this structure to produce a table of contents. You can insert one with Insert > List/TOC > Table Of Contents. If it appears empty in the preview, check that you have sections numbered, as Lyx provides no easy way to include unnumbered sections in the TOC. Many PDF ebooks and magazines (Linux Voice included) have clickable TOCs, so you can quickly go to the section of interest. Lyx can do this as well: just open Document Settings > PDF Properties, make sure Use Hyperref checkbox is on, and Generate Bookmarks (TOC) is also enabled in the Bookmarks tab.
Besides numbering parts of your document automatically, Lyx also makes it really easy to insert various references. This is hardly a surprise for a seasoned Latex user, but usually impresses Office converts. You can move sections (and other elements) around, and never worry about any of your references becoming stale.
Inserting a reference is a two-step process. First, you need to apply a label. To do so, click on the toolbar button with the tag icon. Lyx generates a default label name for you. Prefixing it with “sec:” (in this case) is purely a common convention. Next, move to the place where you want the reference to appear, and click on the toolbar button next to the one with the tag. A dialog will appear, where you should choose a label you want to reference and also set the reference format. For instance, you may want your reference to appear in parentheses, or contain the page number rather than the section. References look like grey boxes in Lyx documents, and you need to update the preview to see them live. References also appear in the Outline pane: just switch it to Labels and References.
Creating presentations with Lyx is not much different from creating texts.
Math and more
The features we’ve looked at so far are quite useful on their own. However, as you are exploring Lyx, there’s a good chances that you’ll need to typeset mathematics. That was the initial design goal behind Latex, and it’s no wonder Lyx provides a full-range support for it.
You start by creating a formula. Click the sigma-character toolbar button, or use the Insert > Math menu for a full range of options. Basically, Lyx distinguishes two formula types: inline and display. Inline formulae appear within a line of a text, while display is given the line all to itself. It’s also possible to create numbered or multiline formulae (aka equation arrays). You can create references to formulae the usual way, and Lyx assigns the “eq:” prefix to formula labels automatically. Formulae also appear in the Outline pane under the Equations section (and the Labels and References section, if you’ve assigned a label to them).
There’s a math palette at the bottom of the Lyx window. From there it’s fairly straightforward to create mathematical objects like fractions: you click on palette buttons and fill the placeholders, like in any equation editor. However, as Lyx builds on Latex, you get professionally-looking output. Moreover, PDF format guarantees that your document will look the same regardless the software you use to open it.
Lyx can do any math you know about, and (unless you are a professional mathematician) most of that you never heard of. Sums, integrals, subscripts and superscripts, roots and matrices are one click away with respective palette buttons.
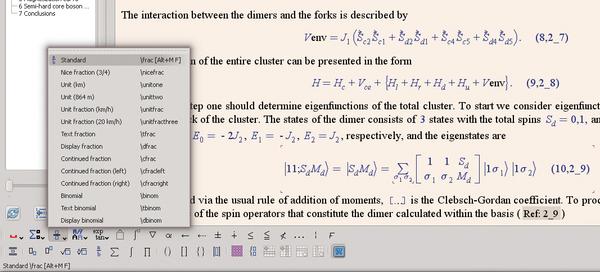
Matrices do not have braces by default. To add them, don’t type: use the palette. The reason braces are inserted that way is to adjust to the expression they bound: compare the two formulae in the image. This is the way to go not only with matrices, but other math objects as well. Arrows (for vectors), hats (for operators) and other types of accents are found under the Frame decoration button. Mathematical functions (like cosine) are in palette as well.
Many people think that switching between mouse and keyboard reduces productivity. If you’re in that camp, you’ll be happy to know that the most frequently used math palette buttons have associated hotkeys that share the Alt+M prefix. For example, press Alt+M then I to insert an integral. Look for other shortcuts in Tools > Preferences > Editing > Shortcuts dialog, or in tooltips. You can also type Latex math mode commands directly, and Lyx will happily provide visual representations for them.
Consider the following sequence. Click on Functions, choose “lim”, and click Subscript, or press Alt+M X. Type n, then to (Latex command), press Space: not to will reappear as a right arrow here. Type infty and press Space to insert an infinity symbol; press Space again to leave the subscript. Press Alt+M (, then type 1, +, press Alt+M f to insert a fraction, type 1, move down, type n. Move the cursor outside the parentheses, switch to Superscript and type n again. Voilà! You’ve just typesetted the formula for natural logarithm base, or Euler’s number, e (2.71828 approximately).
Besides sophisticated math, you can enrich your Lyx documents with other objects you usually expect from a word processor. For example, you can insert a picture. Click on the shapes icon in the toolbar, select a file (preferably a vector format, like EPS), and it will appear in the document. There are some nuances, however. Latex (and hence Lyx) is somewhat stubborn when it comes to placing images.
For a greater degree of control, consider using a float (somewhat akin to Frame in OpenOffice.org). Click on a figure in the dotted frame in the toolbar, or select Insert > Float > Figure in the main menu. Now, fill in the captions and insert your figure the usual way. Then, right-click on a grey box, select Settings, uncheck Use Default Placement and adjust it as you need. Lyx also numbers floated figures so they can
be referenced, and – you guessed it – listed in the Outline pane.
Creating tables (even those that span multiple pages) is not much harder, so we won’t cover the process here. Refer to the Essentials of Lyx tutorial, or better try it yourself.
Beautiful slides
For the dessert, we’ll briefly cover creating presentations. As you already know, from Lyx’s standpoint they are pretty much like the text. The only difference is document class. So, go to Document > Settings > Document Class, scroll down to Presentations, choose Beamer and click on Apply. A few new options will appear under the Frames sections in the Environments drop-down. Most notably, there’s Frame. Select it now: Lyx will prompt you for a frame’s title. Type whatever you want, then move the cursor outside the title field and press Enter. Now you can create any content using environments you already know, including math. You can also use sections to group slides together.
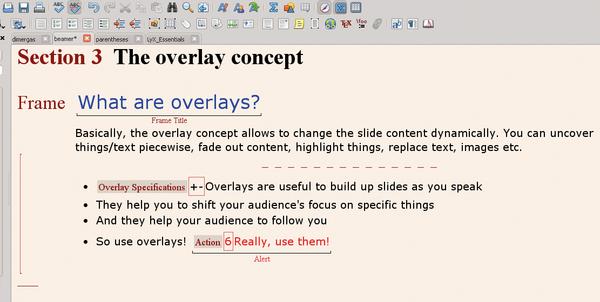
While you’re working with frames, watch for the correct structure. Frames and other environments can be nested, and the containments shown as red bracket on the left. Always check that slide contents are really inside the frame (use Tab/Shift+Tab to indent or deindent). Otherwise, you’ll get weird results.
When you are done with this frame, create another one. You can either insert a Separator environment, or (better) use Edit > Start New Environment (or just press Alt+P Enter). Now, generate a preview. Do you like how it looks? If not, change the Beamer theme. Open Document > Settings, go to Latex Preamble, and paste some Latex code like this:
usetheme{Berkeley}
This will make Beamer use the Berkeley theme. There are many of them available (see https://www.hartwork.org/beamer-theme-matrix), but my personal favourite is Singapore. Choose the one you like best, and don’t forget to update the preview to see the changes.
The interactive options offered by Lyx may feel limited to LibreOffice Impress users, but they are still available. The primary tool here is an overlay, which can show and hide slide contents dynamically, fade the text in and out, highlight it and so on. Almost any document element may have overlay specification attached. For instance, create an itemised list. Now, call Insert > Overlay specification from the menu. You’ll see a grey box saying “Overlay Specification”. Enter “+-” in a placeholder, and you’ll be able to show items in the list one by one with a click of a mouse (or a laser pointer) during your presentation. Overlays provide much more flexibility, and if you’re going to use them seriously, you should definitively look at the example Beamer document that comes with Lyx.
Final touches
Your text or presentation is almost ready. However, before you print it or otherwise show it to the wider public, you may want to do some polishing.
Start with changing the fonts via Document > Settings > Fonts. Changing the Default family affects the document’s base font; document class determines the default setting here. If (say) you aim strictly at screen readers, try switching to Sans Serif. Actual fonts used as Roman, Sans Serif and Typewriter (monospace) are chosen in drop-downs below. Better stick to Tex fonts and use something non-default here (Latin Modern is a usual recommendation). Now, you can export the document to its final destination format. It’s PDF usually, but you can also opt for EPS or even HTML. In the latter case, a folder named YourDoc.html.LyXconv rather than a file will be created.
Hopefully this tutorial gave you enough to feel the potential of Lyx. This tool owes many of its superpowers to Latex, but packages them in a friendly, easy-to-use shell. There are many other features to try, and we encourage you to experiment and share your findings with others. Happy Lyxing!
Create custom hotkeys
Lyx provides shortcuts for many of its features, but not all of them. If you find yourself touching the mouse too often, there is a way to remedy this.
Open Help > Lyx Functions and look up the command for the function you need. If, for example, you’re composing a math text heavy on exponents, it would be math-insert exp. Now, go to Tools > Preferences > Editing > Shortcuts, and click on New. Enter the command, and assign it a shortcut, say Alt+M Z (no mnemonic, it just happens to be unused). Now, when you create a formula, Alt+M Z will insert an exp. You can also run commands directly from the Lyx command buffer. It’s available with View > Toolbars > Command Buffer or via Alt+X. Simple!
This is a Lyx command line, er, buffer.


