Creating an Android app with App Inventor 2
Did you think that building your first Android app world be difficult? Let us guide you through a tool that’s as easy as Scratch.
Why do this?
- We will learn the basics of building an application using MIT App Inventor 2 and how we can use coding concepts within our application.
Tools required
- A computer running a recent version of Firefox or Chrome/Chromium.
- An Android device with a camera.
- An internet connection.
- A barcode scanning app installed on your Android device. We used Barcode Scanner by ZXing Team. https://play.google.com/store/apps/details?id=com.google.zxing.client.android
Since the introduction of smartphones in the mid 2000s the world has been gripped by the latest apps. From Angry Birds to lifestyle guides the app has become part of our daily lives. Typically an application for the Android operating system is written using an application such as Android Studio, which uses a traditional textual language that closely resembles Java. For some this may prove daunting as the editor is rather a large beast to deal with. So how can we enable children to learn the basics of creating an app? Well by following this tutorial of course.
In this tutorial we will be using an online editor called MIT App Inventor 2, which enables anyone to create their own Android application using an interface that’s not too different to Scratch.
First, open up a web browser and visit http://appinventor.mit.edu then click on Create, which is in the top-right of the screen. In order to use App Inventor you will need to register for an account; this enables you to create and store your projects in the cloud enabling access from another machine.
The first interface that you can see is the Designer interface, and in here you will create the look and feel for your application, for example adding images, text and buttons. The Designer interface is split into four panes, and they are from left to right:

Our application is a QR code scanner app that triggers the playback of multimedia content.
QR codes
QR codes have been with us for many years and have been used to create an automated method of launching a web browser to a specific page and been used to automatically send an SMS to a specific number.
QR stands for Quick Response and was developed in 1994 by Denso Wave as a means to track vehicles during the manufacture process for the Japanese motor industry.
In this project we created a series of QR codes that stored a plain text value that was passed to our app once the code was scanned. To create your own QR codes there are many online resources; for this project we used the resources at http://qrcode.kaywa.com, which are free of charge. To use the site, select the type of code that you require, in this case text, which can be found under the More drop-down menu. In the white box type in the text – we used RPI for our first code – then click Generate. Hey presto you have created a QR code.
Palette
Just like Scratch has a palette of commands, so does App Inventor. In here you’ll find user interface components such as buttons, lists and picker applets. There are also components for layout, working with media such as audio and video, canvas tools to create graphics. You can also utilise sensors such as location, barcodes and accelerometer using this tool. In the Social menu you have tools for accessing contacts, sending and receiving text messages and even Twitter. In the Storage menu you’ll find different storage formats for your projects data. In the last two menus, Connectivity and Lego Mindstorms, you’ll find components that enable your device to talk over Bluetooth and work with Lego Mindstorms devices.

The Designer interface contains all of the components that are used to interact with the application and other forms of input, such as sensors and cameras.
Viewer
Components from the palette can be dragged into the centre of the screen, the Viewer, where there’s a simulation of a phone screen. Components such as buttons, lists and images are known as visible components, in that they can be seen on screen. Non-visible components such as TextToSpeech or Sound can be controlled using visible components.
To the right of the Android device simulation we can see the Components pane, which shows all of the components that are in use for our project. By clicking on a component the final pane, labelled Properties, changes focus to reflect the component that has been selected. In the Properties pane we can alter various aspects of components.
So where the Designer interface provides a means to alter the look of a project, our next interface will enable us to program the behaviour of our project.
Our project
In our project we will be creating an application that can read QR codes and use the data contained in the code to trigger the playback of audio, video and images. Potential use cases for this type of project can be interactive art installations, notice boards in schools and public places and audio guides for working with equipment in a makerspace.
The project works like this.
User presses button.
Button is programmed to launch a barcode scanner app
A QR code is scanned and the value contained in the code is translated.
The value is then compared to three known values using If…Else If…Else If.
If the value is equal to “RPI”.
Create a pop up window to display a message.
Play audio.
Play a Youtube video.
Else If the value is equal to “Pibrella”.
Create a pop up window to display a message.
Play audio.
Play a Youtube video.
Else If the value is equal to “ROBOT”
Create a pop up window to display a message.
Play audio.
Open an image on your phone.
We’ll start by creating a new project, so make sure that you’re in the Designer interface. You can create a new project via the Projects drop-down at the top-left of the screen. Select Start New Project and give your project a name followed by pressing OK to continue. After a few seconds the screen will update and present a blank representation of an Android device.
For our project we will need the following visible components
- Image x 3
- TableArrangement
- Button
- WebViewer
And the following non-visible components
- BarcodeScanner
- Notifier
- Sound
- ActivityStarter
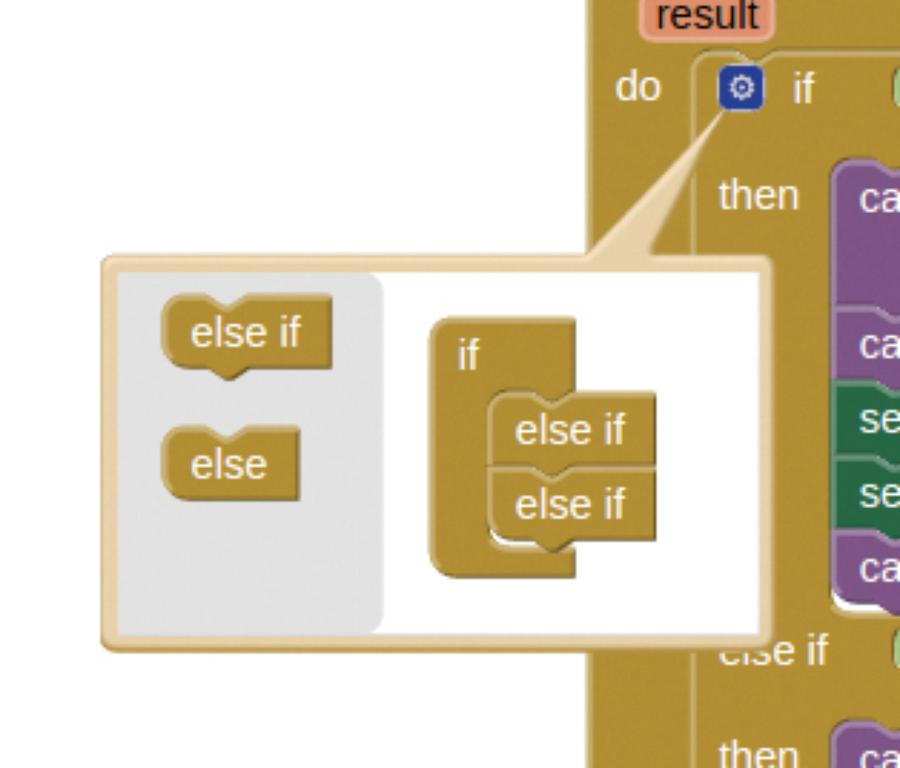
Initially the if construction only has one possible condition. You can add more using else if, which can be found via the blue cog icon.
Visible components
From the User Interface section of the Palette we will grab the image component and drag it into the Viewer area, ensuring that the component is hovering over the Android screen. Let go of the image component and it will snap to the top-left of the screen. This will be the image for the top of our app. If you would like the image to stretch across the screen look in the Properties pane for the width option and change it to Fill Parent. With the image in place our next component is an invisible TableArrangement component that can be found in the Layout section. Place this underneath the image and change its properties so that it has one row and three columns, as this will help us later in the project. Next, insert a Button component into the middle cell of the table that you have just created, and change the text property of the button so that it instructs the user to press it.
Next we need to do a little hacking to ensure that our button is centred. The best way to do this is to create an image that is 100 pixels wide by 10 tall using the Gimp image editor, upload it to App Inventor and place it in each of the cells to the left and right of the button using Image components. For each image edit its properties so that it Fills Parent, and hey presto your button will be centred.
For our last visible component we’ll use a WebViewer from the User Interface section. The WebViewer enables web content to be displayed inside an app. We changed the HomeUrl property to the Linux Voice website.
Running and installing apps
MIT App Inventor 2 comes with two solutions to test your apps. The first is a companion app that can be installed via the Play Store, it’s called MIT AI2 Companion and it is a free download. This app connects your Android device to your app and enables you to test and amend your app, with changes being instantly reflected on your Android device. This is the best way to test your app as you will be testing on real hardware. For this tutorial I tested compatibility using two devices, an HTC Desire HD running Android 2.3 and a Motorola Moto G running Android 4.4.
If you do not have access to an Android device then you can use the Android Emulator which can be found via their website http://appinventor.mit.edu/explore/ai2/linux.html
Installation of the emulator for Debian based systems is made easier thanks to a dedicated DEB file. For other Linux distros download the tar.gz archive and follow the instructions for installation.
Once installed the emulator should be called from the terminal using the following command
/usr/google/appinventor/commands-for-Appinventor/aiStarter &
The emulator will now work in the background, return back to the App Inventor interface and click on Connect > Emulator, found at the top centre on the screen. This will now enable your project to connect to the Emulator and run a virtual Android device. On the home screen of the device is the MIT AI2 Companion app. Use your mouse to activate the Companion app, and in a few seconds your project will be on the virtual Android device.
The companion app, which enables you to test and debug your application before installing it, can be found in the Google Play store.
Non-visible components
In the Sensors section we can see the BarcodeScanner component; drag this on to the Viewer pane. The component will not rest in the Android device, rather it will drop to the bottom of the Viewer pane due to it being a non-visible component. From the User Interface section grab the Notifier component and drop it into the Viewer. Our next component is the Sound Player, which can be found in the Media section. Drag this in the same way as the other components. With the Sound Player component highlighted you’ll see the Properties panel change to reflect the properties of this component. In this case we see the Minimum Interval and the Source; we are interested in the Source. Click on the white box under the source and a simple menu will pop up. Click on “Upload File…” and select the audio file from your computer. MIT App Inventor is compatible with WAV files and MP3. The last component to add to the app is ActivityStarter, which can be found in the Connectivity section. This component enables us to open other applications with our app, for example YouTube or Google Maps.
With the design of our app complete for now, let’s turn our attention to creating the code that will make our app come to life. Change to the Blocks interface via the button in the top-right of the screen. In the Blocks interface we can see the blocks that we can use in our project – these comprise the built-in programming concepts that are specific to the components used in the Designer interface.
We’ll start with creating the Button Clicked event. In the Blocks pane find Button 1(it will be under Screen 1). Click on Button 1 and a new menu full of blocks will appear. We’re interested in the top block, which is a C-shaped block labelled “When Button1.Click”. Click and drag the block on to the viewer. C-shaped blocks such as this are used for control and events, such as pressing a button. Inside the “When Button1.Click” block we need to add “call BarcodeScanner1.DoScan” which is found inside the BarcodeScanner1 blocks menu. So what have we just achieved? We have created an event (the button press), and an output that is triggered by the event (launching the barcode scanner app).
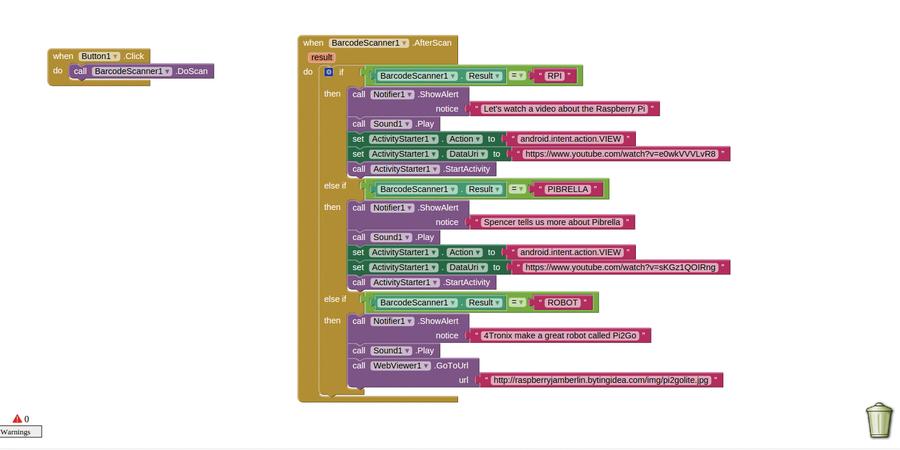
The blocks used to program your application should end up looking like this. A high resolution version can be found in the Github repository for this project.
Evaluate the QR code
With the barcode-scanning aspect of the project complete, we need to build an algorithm that evaluates the code presented and acts accordingly. When the barcode scanner reads a QR code, the code contained within is decoded into plain text. This is then compared to the hard-coded values in our algorithm. To start we need another C-shaped block from BarcodeScanner1 labelled “When BarcodeScanner1.AfterScan” and inside it we will store the algorithm to run after a successful scan. To start our algorithm open the Control Blocks and locate “If…Then” and drag it into the Viewer pane. You will notice that there’s only room for one condition and the resulting output triggered by it. For our algorithm we need to have two further conditions to evaluate against and to add them we need to click on the small blue icon located in the top-left of the C-shaped block. This will create a pop-up window that enables us to alter the structure of the block to accept further conditions by dragging the else if into the smaller representation of the algorithm, once completed you must click on another part of the screen to close the small pop up. Our C-shaped If block now has two further conditional checks that we can now use in our code. Inside the first of our conditions, “If”, we set the first test
If the results of the scan are the same as “RPI”
To create this test we need to use a number of blocks. First, look inside the Logic blocks for ‘_ = _‘. This block uses comparative logic to evaluate the left value to the right. If both are the same, the answer will be True, and the condition is met. In the first blank we need to place the “BarcodeScanner1.Result” from the BarcodeScanner1 Blocks and in the second blank we need to use a block from Text, which is just a blank string. Inside that string we need to type in the text that will be contained in our QR code. With the first condition created now we need to create the code that will run once it is met. We’d like to have a pop-up message appear on the screen. For this we can find the block in Notifier1 called “call Notifier1.ShowAlert notice”. Attach this block to the “then” section of the If condition. Next we need to use a Text block labelled “ ” (for a blank string) and attach it to the ShowAlert block that we have just placed – remember to add your own text to the blank string. This now creates a pop-up that will produce a message once a known code has been scanned. Now we need to add the “Call Sound1.Play” block from Sound1 and attach it to the pop-up message that we just created. This will play the audio file that we earlier uploaded.
Our next series of blocks inside of the If condition control opening an external application, in this case YouTube. From the ActivityStarter1 blocks use “set ActivityStarter1.Action to” and also grab a blank string block from Text. Inside the blank string box, type the following.
android.intent.action.VIEW
This instructs the app to open an external viewer application. Our next block is also from the ActivityStarter1 palette and is “set ActivityStarter1.DataUri to”. Again, you will need a blank string block from the Text palette. Inside the blank string block, paste in the link to a YouTube video. Our last block in the If condition is “Call ActivityStarter1.StartActivity” and this block will start the process of calling the external viewer application, in this case YouTube, and pass it the URL for the video.
For the next “Else If” condition we can duplicate the code already written for “If” by right-clicking on the code and selecting “Duplicate”; once you have the duplicate blocks, arrange them inside of each “Else If” section just like before. Remember to change the text that we expect to see in the QR code, and the message contained in the pop up.
For the last “Else If” condition the blocks contained are a little different. The condition test, comparing the QR code to a keyword is the same, but the code that is run once this condition is true is different. A pop up is still created and a sound is played, but rather than call a YouTube video the app will open an image inside the app. To do this grab “call WebViewer1.GoToUrl” from WebViewer1 palette, and grab a blank string from Text. Inside the blank string block paste a link to an image. This action will trigger an image to appear inside of our app. Well done: you’ve made an app!
To test your app on your Android device you’ll need to connect your device to the internet and then start the MIT AI2 Companion app on your Android device. On your PC in the Blocks or Designer interface, click on Connect and then AI Companion. You can enter the code from the PC into the Companion app on your device or you can scan the QR code. The two should now connect up and your app will be on the screen of your device. Once you’re happy with your app you can build it into an installable file for use on many devices. To do this, navigate to the Build menu and select “App (provide QR code for .apk)”. This will build the application on MIT’s servers and provide you with a QR code to download the app to your Android device. Use the barcode scanner app installed on your device to download the file.
Once downloaded you can simply click on the file to install it on to your device. Typically apps are installed from a “trusted” source, which is the Play store. Installing your own apps requires that you allow installation from “Unknown Sources”, and you can find this option in your device’s Settings > Security. Put a tick in the box and retry installation of your app.
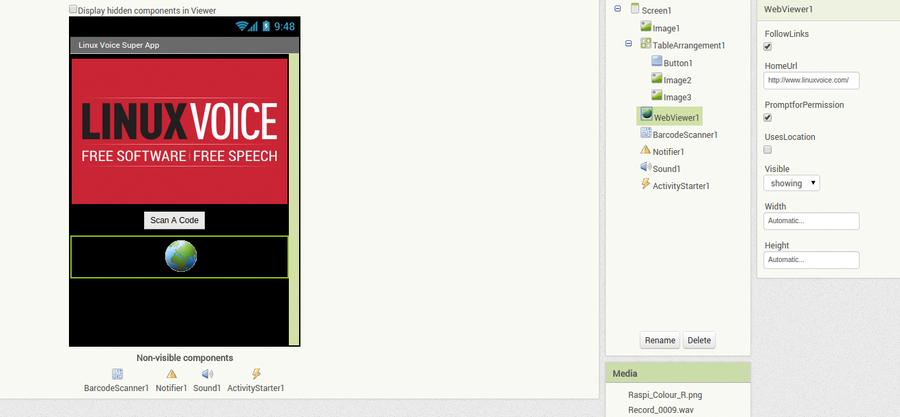
The final application should look something similar to this layout which we used in this tutorial.
Project code
You can find the complete code for this project at our GitHub repository https://github.com/lesp/LinuxVoice_Issue13_AppInventor, or those of you unfamiliar with Git can download the complete package as a ZIP file from https://github.com/lesp/LinuxVoice_Issue13_AppInventor/archive/master.zip.
Related Posts


About The Author
Les Pounder
Les Pounder is a maker and hacker specialising in the Raspberry Pi and Arduino. Les travels the UK training teachers in the new computing curriculum and Raspberry Pi.