Déjà Dup: Backup for everyone
Get acquainted with the easiest backup tool on the planet to help you save yourself from the inevitable data apocalypse.
Why do this?
- You’d really risk losing data?
- Quick to set up and easy to use.
- Designed for the everyday desktop user.
We care about you. No, we really do. Which is why you should believe us when we say that sooner or later you will lose valuable data. You can spend a fortune on a storage medium that’s anti-scratch, dust-resistant, heat-proof and contains no moving parts, but what you really need to do is to invest some effort in backing up your data.
Although it isn’t particularly time consuming, backing up data requires careful thought and preparation, and involves more than just zipping files into a tarball. Unfortunately this means it’s often neglected. This is where Déjà Dup comes into play. It’s different from the plethora of other tools in that it has a minimal interface so as to not overwhelm new users. But it’s based on the powerful Duplicity command line backup tool and provides just the right number of features for desktop users who aren’t used to the ways of a backup tool. On some distros, such as Ubuntu, Déjà Dup ships pre-installed, while it’s available in the official repos of most others. You can configure the software in a matter of minutes without delving into lengthy documentation.

Although it’s changed somewhat, the main interface of the app still essentially contains only two buttons – to back up and restore data.
The first time you fire up the tool, it lands on the Overview page which, as expected, tells you that there are no recent backups nor are there any scheduled. Before it can save you from data doomsday, you’ll first have to set it up.
Navigate to the Folders To Save section, which by default lists your Home directory. This is generally a safe bet for most users. If you know what you are doing you can also remove this location and add any particular directories that you wish to back up. You can also use the + button to add other folders on other mounted drives or network shares.
Then switch to Folders To Ignore and specify folders you don’t need to back up. By separating the directories to include and exclude in the backup, Déjà Dup gives you the flexibility to include a large directory – for instance /home – in your backup, while specifying parts to leave out, such as .cache/.
To help you get started this section already lists the Trash and Downloads folders, though many users might want to remove the latter from the list unless you really don’t want to safeguard the contents of the Downloads folder.
Next, move on to Storage location and use the Drop-down list to pick one of the supported locations. This can be a local hard disk, a remote location that you connect to via FTP or SSH, or a cloud storage service like Amazon’s S3. Depending on the storage location you select, the app will ask you for further details. For example, if you select the FTP option, you’ll be asked to provide the IP address of the FTP server along with the authentication information and the location of folder where you want to store the backups. To save the backups to Amazon’s S3 it’ll need your S3 Access Key ID and for the Rackspace Cloud Files service it’ll need your username.
Finally, you can switch to the Scheduling section and select a policy for keeping old backups. By default, old backups will be kept until the target storage location runs out of space, but you can also specify a different time period depending on the importance of the data. Before you can set a schedule for the backup you’ll have to activate the app by toggling the button at the top right-corner of the window to On. Once the configured backup is enabled, you can use the pull-down list on the Scheduling section to either run this backup every day or every week, which is the default option.
To create the initial backup, switch to the Overview section and click on the Back Up Now button. The tool will provides a summary list of the directories involved and will begin. While creating the backup, the app will ask you to optionally encrypt the backup. You can enter a password in the space provided or choose to back up the files without a password. This initial backup may take some time, but subsequent backups are much faster because they are incremental and only back up data that has changed.
Once the backup has been created, the Overview window will inform you when the last backup was taken and when the next one is scheduled.
Use the Custom Location option to specify a remote location supported by the Gnome Virtual File System (GVFS).
Prepare for a backup
While Déjà Dup takes the pain out of setting up the actual data backup process, a crucial part of the process is preparing for it which involves careful consideration. For starters, you need to decide where you want to store your data. Keeping it on another partition of the same disk isn’t advisable, since the whole disk might fail and render the backup copy useless.
One solution is to keep the backup on another disk. If you have multiple disks and a spare computer you can even set up your own Network Attached Storage device using software like Open Media Vault (instructions in our tutorial in LV009). To protect your data against physical disasters, such as fires, floods and theft, make sure you keep the backup as far away from the original as possible, perhaps on a cheap cloud storage service. Each method has its advantages – hard disks are cheap and readily available while removable disks offer portability, and online storage is globally accessible. The kind of data you wish to back up also influences the choice of storage medium. A DVD might be useful for holiday snapshots, but isn’t going to be much use to a professional photographer.
You’ll also need to work out the appropriate backup methodology. Do you want to back up manually or automatically based on a schedule? The correct backup frequency varies based on the kind and value of data being safeguarded. Depending on the size of the files, it might not be a good idea to back them up completely everyday either.
To restore files from the backup, launch the app and click on the Restore button in the Overview section. The app will launch the Restore wizard, which will first prompt you for the location of the backed up files. Just like before, select the remote location where you’ve backed up the files and enter any associated information such as the IP address and your login credentials.
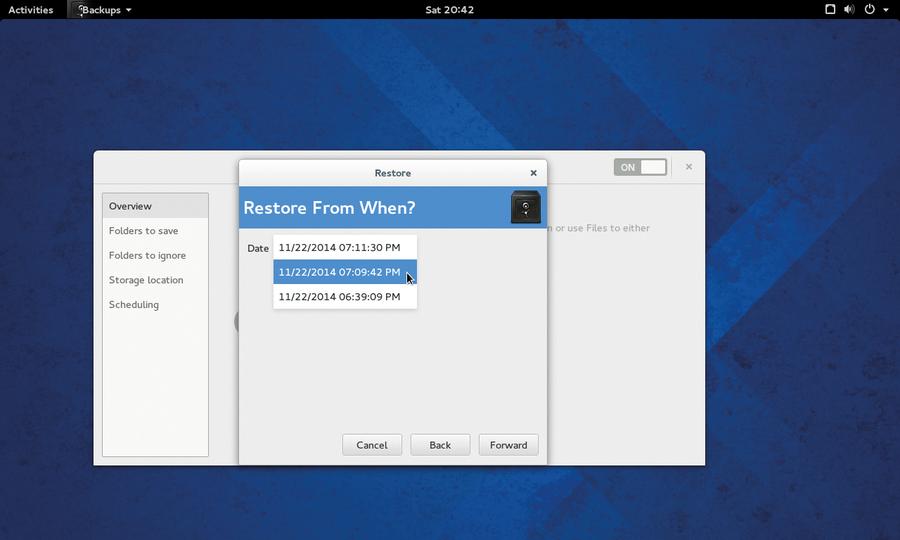
Déjà Dup will then scan the remote location and in the next section it’ll display a time-stamped list of all the backups. Select the one you wish to restore from and move on to the next step. The app will now give you the option to either restore the backed up files to their original location or into a specified folder. Before restoring the files, the app will prompt you for the password if the backed up files were password protected.
One of the best features of the app is its ability to restore individuals file as well. To do this, head to the folder from which you have accidentally lost files. Right-click inside the folder and select the Restore Missing Files option from the context-menu. The app will scan the folder against the most recent backup of this folder and display a list of files that are in the backup but currently missing from the folder. Now use the checkbox besides the listed files to select the ones that you wish to restore and the app will restore their latest versions.
It’s worth noting that Déjà Dup is missing some of the flexibility you’d get with other backup tools. One such missing feature is the ability to create backup sets to backup different files into different locations. Déjà Dup, instead, is designed to back up the specified folders into the specified destination, each and every time you schedule it to run. Déjà Dup isn’t meant for use in a complex environment like an enterprise, but is perfect for safeguarding data for home and SOHO users and also gives you the flexibility to restore individual files from the backups with ease.
What to back up?
Do you really need to backup your entire home directory, or is just an overkill? Here’s what you need to know while selecting directories for backup. Most modern distros keep the files you’ve created or downloaded under directories such as
~/Documents, ~/Downloads, and ~/Desktop, so you’ll want to include them in your backups. Also don’t forget to check
/home for any important documents. Some apps, such as email clients, also keep your downloaded emails, attachments and address books under hidden directories beneath your home folder, so make sure you include them as well.
Then there are apps that create their own directories to store files. Most prompt you for the location, while some may create them on their own during installation. Make sure you check for and include such directories which are usually listed under the Preferences section of the apps. Be vigilant, though. Some of these directories contain cache directories, which needlessly add to the backup’s size. Finally, if there’s a piece of software that’s crucial to you and you don’t want to spend time downloading it again, back it up by saving the cache directory for your distro’s package management system.
Related Posts


About The Author
Mayank Sharma
Mayank Sharma has been tinkering with Linux since the 90s and contributes to a variety of technical publications on both sides of the pond.