PAM: Pluggable Authentication Modules
Take control of your system’s security policy by mastering the minutiae of PAM.
Pluggable Authentication Modules (known to its friends as PAM) is one of those technologies that most users are entirely unaware of, like the engine management computer in their Volvo. Basically, PAM provides a framework within which an application can assemble one or more stacks of PAM modules to perform the authentication tasks it needs to perform and to implement the security policy that it (or the system administrator) wants to implement.
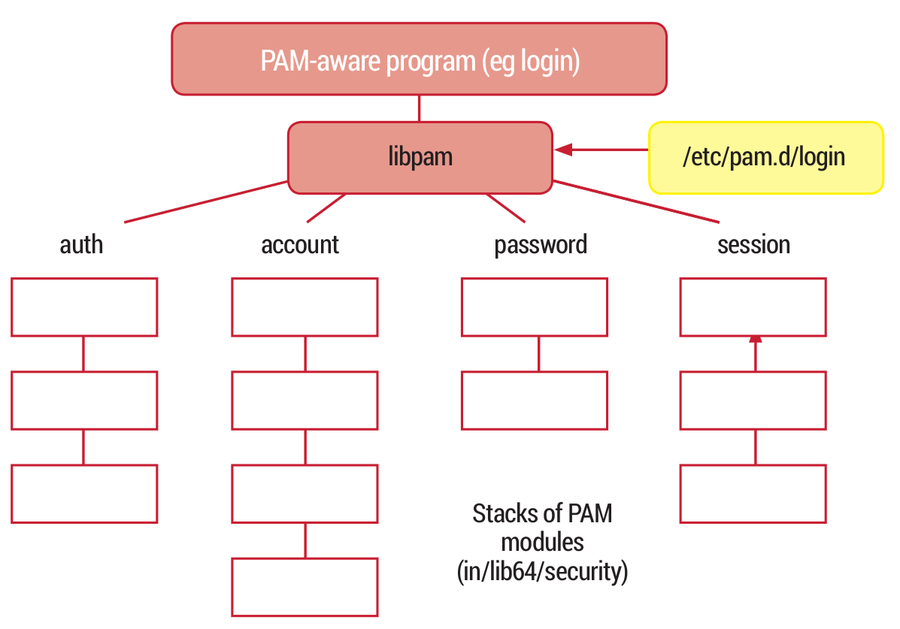
From a system administrator’s point of view, PAM has two parts. The first is a set of configuration files in /etc/pam.d that define how an application’s PAM stacks are to be assembled. The config file is usually named after the application, so that (for example) the file for the ssh daemon would be
/etc/pam.d/sshd. The second part is a collection of PAM modules that are implemented as dynamically linked libraries. Red Hat puts them in /lib64/security, though different distros choose different directories. The range of tasks that these modules perform is quite diverse, ranging from doing traditional Unix-style authentication (pam_unix) to enforcing password strength (pam_cracklib) and locking an account after too many failed logins (pam_tally2). The PAM modules table on the facing page provides a longer list, but it is by no means complete. The modules listed in the table are relatively mainstream but they may not all be installed by default on your distro.
By the way, PAM is entirely in userspace. There are no PAM kernel modules.
PAM in a paragraph
Here’s how it works. A program that wants to use PAM links to a library called libpam. This is probably the least visible part of PAM but it’s really the heart of the whole thing. Under control of the program’s PAM config file (we’ll see an example in a moment), libpam assembles up to four stacks of modules that the application can use. The four stacks are called auth, account, password and session, and they refer to the four classes of activity that PAM helps to manage. Typically, an application won’t use all four stacks; it may only need the auth and session stacks, for example.
Let’s suppose you’re a program that wants to perform authentication. Maybe you’re the classic command line login program. Through pamlib, you call the PAM modules in your auth stack, in order. You don’t even know what those modules are; this information is held in an external configuration file, which pamlib knows about, but you don’t. Each PAM module performs its function, and returns a ‘success’ or ‘failure’ status. The status values of the modules combine (according to rules in the config file) to provide a success or failure status for the stack as a whole.
So the basic concept is not really that hard. The devil is in the details. Let’s take a look at a typical PAM configuration file:
auth required pam_securetty.so
auth required pam_unix.so shadow nullok
auth required pam_nologin.so
account required pam_unix.so
password required pam_cracklib.so retry=3
password required pam_unix.so shadow nullok use_authtok
session required pam_unix.so
This particular file assembles all four stacks – auth, account, password and session. The auth stack has three modules; the password stack has two; the account and session stacks each have just one. So to perform authentication, for example, the program first calls pam_securetty. This module can restrict root access to specific ‘secure’ terminals. Then it calls pam_unix. This is an important PAM module; it handles the traditional authentication against a local account database. Finally, pam_login is invoked to prevent non-root logins if the file
/etc/nologin exists. The nologin file is usually created during the shutdown sequence; its purpose is to stop regular users logging in during the shutdown period.
The second field in the PAM config file specifies the control flag, and you will notice that all of these modules are marked as required. This means that they all have to succeed for the stack as a whole to succeed. The other control flags (requisite, sufficient and optional) are described on page 66 and I’ll re-visit them later. You’ll also notice that some of these modules have parameters passed to them. For example in the password stack, pam_cracklib has the parameter retry=3. Some of the modules even have their own configuration files.
Factoring out
It’s common for the same pieces of the PAM stack to appear in the configuration of several applications. To make this easier, there’s an include control flag that brings in stack definitions from an external file. On a Red Hat-style system the most widely used example of this is the file /etc/pam.d/system-auth. You’ll find this file included in the PAM stacks of most applications through a line like this:
auth include system-auth
Other distros do things slightly differently. On Ubuntu there are four of these “common” files (common-auth, common-account, common-session and common-password) and they are included by lines of the form:
@include common-auth
“Factoring out” pieces of the PAM stack in this way not only makes the individual PAM config files shorter, it also means that you can change the login policy for most PAM-aware applications just by editing the one common file. As an example, Red Hat has a little tool called authconfig-tui, which you can use to enable authorisation against LDAP, Kerberos, or Active Directory accounts. The only PAM file that this tool needs to adjust is system-auth. There are even some applications whose PAM configurations do nothing except include the relevant stacks from system-auth.
Wait! There’s more!
It turns out there’s more to PAM configuration than simply assembling stacks of modules. For a start, many PAM modules can be passed parameters (specified within the PAM config file). Let’s look at a couple of examples:
The pam_cracklib module (which does password strength checking and is usually found in the password stack) accepts a parameter like minlen=9 that specifies the minimum password length; it also accepts retry=3, which says to give the user three attempts to enter an acceptable password. So you might see a line like this:
password required pam_cracklib retry=3 minlength=9
Going a step further, some PAM modules have their own configuration files. For example, pam_time (which implements time-of-day access control) reads its configuration from /etc/security/time.conf, where you might find rules of breathtaking obscurity, such as this:
login ; * ; !fred ; MoTuWe0800-2000
By the way, although pam_time plays its part in determining whether a user is allowed to log in, it is not concerned with authenticating the user, and so it belongs in the account stack, not the auth stack.
In most cases the PAM modules have man pages that document these parameters. (The command apropos pam may help get you a list of these.) Sometimes the individual config files have man pages too. In some cases the documentation is a little thin on the ground, but it’s a very great deal better now than it was in the early days of PAM.
Why bother?
It’s when you get down into the details of PAM – the control flags and the large range of modules with their parameters and config files – that you start to get a feel for its complexity. And since Linux distributions invariably include working PAM configurations out of the box it’s reasonable to ask why you should care. Well, I’d wager that many system administrators actually don’t care – they leave their default PAM configurations well alone. But there may be times when you need to bring extra PAM modules into play to implement pieces of your security policy, such as “users are only allowed to log in between 10am and 4pm on Mondays and Tuesdays” or “passwords must be a minimum of 10 characters with three character classes”. Or you might need to augment your login process to include user accounts stored in a Windows Active Directory (via the winbind daemon). Or maybe you’re plagued by brute-force login attempts from a specific host and would like to block them. There are PAM modules to do all of these things.
PAM-aware applications assemble stacks of modules to implement their security policy, under control of a configuration file in /etc/pam.d.
Getting to grips with the control flags
I’ve been trying hard to avoid a proper discussion of the control flags in PAM because, frankly, they are painful and I don’t like to inflict pain. But they have a major impact in the way PAM stacks work and we can’t really ignore them. There are two styles of syntax for defining the control flags – a simple one and a more complicated one.
We’ll take the simple syntax first – it uses the four keywords sufficient, required, requisite and optional. Recall that each PAM module returns a ‘success’ or ‘failure’ status. The control flags specify how the status returned by the individual modules in a stack contributes to the success or failure of the stack as a whole. Consider a stack such as the example we showed earlier, in which all modules in the stack are ‘required’. Then all modules must succeed for the stack to succeed. This seems to me the most straightforward and obvious way for modules to combine.
The required flag is similar, but, if a module fails, the stack is immediately abandoned – later modules are not invoked. The sufficient flag does what it says on the tin – if the module succeeds, the stack will succeed and later modules are not called. Finally, the optional flag means that the return status of the module is ignored. This flag is often found within the session stack, where modules are called for their side effect (such as setting environment variables or creating an initial home directory) rather than for a yes/no decision. There’s a more complex syntax that can be used for the control flags, which gives you finer grain control over querying the return status of a PAM module, and more options on deciding what to do in each case. This form of control flag consists of a series of status=action pairs, in square brackets. Here’s an example:
auth [user_unknown=ignore success=ok default=bad] pam_securetty.so
This example is being used to distinguish the case where the username is unknown from the case where the module’s ‘secure tty’ test fails, and to react differently in the two cases. The return status values are not well documented. These extensions, which almost turn PAM configuration into a programming language in its own right, are difficult to get your head round, and (I’m pleased to say) don’t seem to be very common in modern PAM configurations.
So there you have it. Next time the conversation in the pub turns to PAM, you can smile enigmatically and say “ah yes, I know PAM well!”
Dive under the skin of your Linux system to find out what really makes it tick.
Command of the month: ldd
The ldd command answers the question “Which libraries does this application use?”. Here’s a simple example:
# ldd /bin/bash
linux-vdso.so.1 =>
libtinfo.so.5 => /lib64/libtinfo.so.5
libdl.so.2 => /lib64/libdl.so.2
libc.so.6 => /lib64/libc.so.6
/lib64/ld-linux-x86-64.so.2
It’s not at first sight the most exciting of commands, but there are some quirks here that you can uncover, expecially if you wrap a little shell scripting around it to answer the opposite question: “Which programs are linked against this library?”
Here’s the script I came up with – it could be spruced up in several ways but it does the basic job:
#!/bin/bash
# Script “whatuses”
# Finds which executables are linked against a given library
lib=$1
for x in /usr/bin # Better to traverse entire $PATH
do
if ldd $x 2> /dev/null | grep $lib > /dev/null 2>&1
then
echo $x uses $lib
fi
done
Here are a couple of examples. First, there’s an access control mechanism called ‘TCP wrappers’, which is implemented by the library libwrap.so. So we can answer the question “Which apps use TCP wrappers?” like this:
./whatuses libwrap
/usr/bin/empathy uses libwrap
/usr/bin/gnome-shell uses libwrap
/usr/bin/pulseaudio uses libwrap
/usr/bin/vinagre uses libwrap
I’ve edited most of the output for brevity. Or we can ask “Which apps are PAM-aware?” by looking for linkage against libpam:
# ./whatuses libpam
/usr/bin/at uses libpam
/usr/bin/login uses libpam
/usr/bin/passwd uses libpam
/usr/bin/su uses libpam
/usr/bin/vncpasswd uses libpam
Again, the output is trimmed – Linux dependencies can get complicated, but ldd can help make sense of them!
Related Posts


About The Author
Chris Brown
A veteran Unix and Linux enthusiast, Chris Brown has written and delivered open source training from New Delhi to San Francisco, though not on the same day.