Raspberry Pi: Simple forms of input
It’s time to play with some affordable methods of getting input into your tiny Linux machine.
Why do this?
- Create a multi-sensor alarm system to protect coffee and biscuits.
- We will program it using Python and build a user interface using a module called easyGUI.
- Learn about sensors and alternative methods of input.
Tools required
- Raspberry Pi (Any model).
- Raspbian OS.
- PIR sensor (BISS00001 are very common on eBay).
- HC-SR04 Ultrasonic Sensor (Less than £5 on eBay).
- Reed Switch (We used http://uk.farnell.com/comus/8601-0211-015/switch-reed-spst-no-0-1a-24v-smd/dp/2409191)
- Male to male jumpers
- Male to female jumpers.
- 1kΩ resistor.
- Breadboard.
When thinking input methods for a computer we generally think of keyboards and mice, but there are many other different types of input. For example, the use of touch and gesture controls in mobile devices is thanks to capacitive touchscreens and accelerometers feeding data to the system that acts on the input. Sensors are unique forms of input. They provide information about the world around us and can be used to trigger alarms, gather data on animals and provide valuable data for scientific research.
In this tutorial we will look at two sensors and a magnetic switch, all of which are really simple forms of input. For our sensors, we have an ultrasonic sensor commonly used to sense distance and found in cars’ parking sensors. We will then use a sensor commonly used in burglar alarms to detect movement – this is a Passive Infrared (PIR) sensor. Our magnetic switch is called a reed switch, and these are commonly used as door sensors.
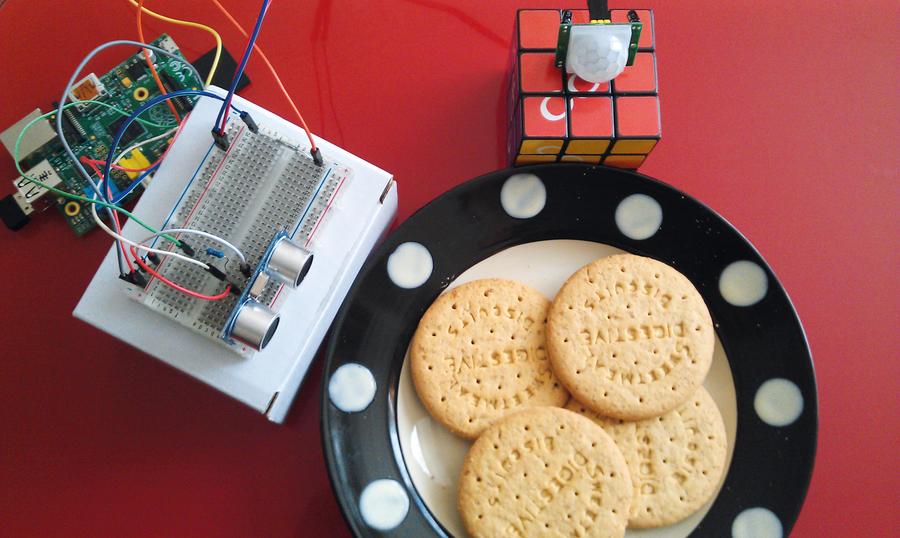
Our final project is ready to defend against the hordes of digestive eating enemies or hungry dogs.
PIR sensor
Passive Infrared sensors operate by monitoring infrared light. When it detects movement, the sensor sends a high signal to your Raspberry Pi, which we have programmed to react.
PIR sensors are one of the easiest sensors to wire up to your Raspberry Pi, as they only come with three connections: VCC, which connects to the 5V pin of your GPIO (pin 2); GND or ground, which connects to pin 6; and finally Output (the pin that sends the alert signal to our Pi), which connects to pin 7 of your Pi.
With the sensors connected, let’s build the Python code that will enable us to use it.
Using the PIR sensor with Python is relatively straightforward, requiring nothing more than telling the Raspberry Pi which GPIO pin the PIR sensor is attached to and to watch the status of that pin for any changes. We start by importing two modules: the first enables Python to use the GPIO pins. It’s called RPi.GPIO, but this is rather unwieldy to use in our code so we rename it to GPIO instead:
import RPi.GPIO as GPIO
import time
Next we set up the GPIO to use the logical BOARD pin numbering system and then create a variable called PIR_PIN to contain the real GPIO pin that we will use as an input for the trigger. The last line instructs Python that we are using pin 7 as an input and that it should expect to receive a trigger:
GPIO.setmode(GPIO.BOARD)
PIR_PIN = 7
GPIO.setup(PIR_PIN, GPIO.IN)
Now we have a little fun and print some funny system messages to the console:
print("Welcome to the LV Biscuit Barrier - System Loading Please Wait")
time.sleep(2)
print("Scanning for intruders")
The last segment of code is the loop that continually looks for a trigger on the PIR_PIN. Once someone tries to steal a biscuit they trigger the trap and a message is printed to the console informing us of the situation. With the alarm triggered, the system waits for 1 second before resetting and waiting for its next incursion:
while True:
if GPIO.input(PIR_PIN):
print("Motion Detected near the biscuits")
time.sleep(1)
Resistors
Resistors are an essential part of electronics, and are used to reduce the electrical current flow and in turn reduce the voltage passing through a circuit. A simple example of the use of resistors is the humble Light Emitting Diode (LED). They work with the 3.3V voltages used on the Raspberry Pi but run hot and bright, just like Rutger Hauer in Blade Runner. Using a resistor inline with the power from the Raspberry Pi pin we can reduce the current and voltage, extending the life of our LED. Without resistors, components would have a shorter life span and we could damage our Raspberry Pi.
Resistors come in a series of colours meant to identify their resistance value, measured in Ohms (Ω). Common resistors used with the Raspberry Pi are
-
220Ω = red, red, brown, gold
-
1kΩ = brown, black, red, gold
-
10kΩ = brown, black, orange, gold
If you would like to know more about resistors, there is a great Wikipedia article http://en.wikipedia.org/wiki/Resistor.

A reed switch is an open switch inside a glass vial – when a magnet is introduced the switch closes.
Reed switch
A reed switch is a small glass tube containing two strips of metal separated by about 1–2mm of space but overlapping. The switch has a “normally open” position, but when a magnet is introduced the two strips of metal snap together and complete a circuit thus allowing the current to flow through the switch. Remove the magnet and the switch opens, breaking the circuit and stopping the current flowing.
Wiring up a reed switch is extremely simple, and is very breadboard friendly. Connect the 3V3 pin from your Raspberry Pi to one end of the reed switch using a breadboard – either end of the switch can be used. The other end of the switch connects to pin 26 on your Raspberry Pi via the breadboard.
Using a reed switch with Python is just as straightforward as the PIR sensor, and we will reuse some of the same code. Let’s take a look at the additions made for the reed switch.
The first part of the code remains the same:
import RPi.GPIO as GPIO
import time
GPIO.setmode(GPIO.BOARD)
PIR_PIN = 7
In a similar way to the PIR_PIN variable, we use another variable to store the GPIO pin used for the input, which is then configured to be an input pin ready to receive the alarm trigger:
reed = 26
GPIO.setup(PIR_PIN, GPIO.IN)
GPIO.setup(reed, GPIO.IN)
There are no changes made to our system starting/greeting message:
print("Welcome to the LV Biscuit Barrier - System Loading Please Wait")
time.sleep(2)
print("Scanning for intruders")
Here we see the most significant addition to our code – we create a second condition, that of the reed switch being triggered. If this condition is true then the code will print the word “Trigger” in the console:
while True:
if GPIO.input(PIR_PIN) == True:
print("Motion Detected near the biscuits")
time.sleep(1)
elif GPIO.input(reed) == True:
print("Biscuit tin has been opened CODE RED!!!")
time.sleep(1)

We used ultrasonic sensors to detect distance to the biscuit – they also make a great pair of eyes for a robot.
Ultrasonic sensors
Ultrasonic sensors have two ‘eyes’ – one is a trigger that sends a pulse of ultrasound towards an object, which then bounces off the object and returns to the other eye which is called echo. The distance is measured using a simple calculation:
Distance = Speed * Time
The most common ultrasonic sensor is the HC-SR04, which can be found for a few pounds on eBay. They come with 4 pins:
VCC 5V power from your Raspberry Pi (Pin 1).
GND Ground (Pin 6).
Trigger Receives a signal from the Raspberry Pi to send a pulse of ultrasonic sound (Pin 11).
Echo Receives the reflected ultrasonic pulse and sends a signal back to your Raspberry Pi (Pin 13).
Because we are working with 5V power we need to protect the GPIO pins of our Raspberry Pi, as they can only work with 3.3V or less. To do this we use a resistor to reduce the voltage down to something more Pi friendly. We’ll use a 1kΩ resistor which has a colour code of BROWN, BLACK, RED, GOLD.
To enable the ultrasonic sensor to work with our existing Python code we need to make quite a few changes. The imports remain the same as in previous sections, but you will notice two new variables called trigger and echo. These new variables identify the GPIO pins used to send (trigger) and pulse from the ultrasonic sensor and receive (echo) an ultrasonic pulse. On the last line you will see something called global distance. This is a variable available outside and inside of a function and, without adding the global element, we would not be able to use the variable inside of a function that we create later in the code:
import RPi.GPIO as GPIO
import time
GPIO.setmode(GPIO.BOARD)
PIR_PIN = 7
reed = 26
trigger = 11
echo = 13
global distance
Next we configure the pins used for the ultrasonic sensor: trigger is an output and echo an input. We also instruct the trigger GPIO pin to be “Low” (in other words start the program with no power being sent to that pin), to reduce the chance of a false reading:
GPIO.setup(PIR_PIN, GPIO.IN)
GPIO.setup(reed, GPIO.IN)
GPIO.setup(trigger, GPIO.OUT)
GPIO.setup(echo, GPIO.IN)
GPIO.output(trigger, GPIO.LOW)
We keep the system startup message the same:
print("Welcome to the LV Biscuit Barrier - System Loading Please Wait")
time.sleep(2)
print("Scanning for intruders")
Next we create a function called reading that controls the use of the ultrasonic sensor. We reuse the global distance variable, thus linking the variable and enabling it to be used in our code.
Our next line is a conditional statement that checks to see if the sensor is detecting anything, if not then the code continues. To enable the sensor to ‘settle’ we introduce a delay using time.sleep of 0.3 seconds.
The next line instructs our Raspberry Pi to send an ultrasonic pulse, via sending a high signal to the trigger pin of our ultrasonic sensor. We then delay for 10 microseconds, which is just enough time for a pulse of significant length to be sent. Then we turn off the trigger pin and flow into two while statements.
While the echo pin is not receiving an ultrasonic pulse it updates the variable signaloff with the current time, and a similar construction is used for signalon when we receive the ultrasonic echo pulse.
With the two times recorded we now do a little maths. Subtracting the signaloff time from signalon time gives us the time taken for the pulse to be sent and return to the ultrasonic sensor, and this is saved as the variable timepassed:
def reading(sensor):
global distance
if sensor == 0:
time.sleep(0.3)
GPIO.output(trigger, True)
time.sleep(0.00001)
GPIO.output(trigger, False)
while GPIO.input(echo) == 0:
signaloff = time.time()
while GPIO.input(echo) == 1:
signalon = time.time()
timepassed = signalon - signaloff
Now we perform another calculation, using the school equation distance = time * speed. Our distance variable stores the answer to the time passed multiplied by 17,000 (the speed of sound) for a half second, so a full second is 34,029 centimetres travelled. Why a half second? Well, we halve the time taken as we need to know the distance from the object, not the time taken to get there and get back. We then print the distance in the console. Our last line in the function is the end of the if..else conditional logic and is used to capture any errors:
distance = timepassed * 17000
return distance
else:
print "Error."
Now we’re on to the home straight and back to the main loop of our code. We keep the first two sensors, our PIR_PIN and reed the same, and we introduce another elif statement that checks to see if the variable distance is less than 10cm. If so, it prints “Biscuit Thief” in the console:
while True:
reading(0)
if GPIO.input(PIR_PIN) == True:
print("Motion Detected near the biscuits")
time.sleep(1)
elif GPIO.input(reed) == True:
print("Biscuit tin has been opened CODE RED!!!")
time.sleep(1)
elif distance < 10:
print("Biscuit thief has struck again, deploy ill-tempered jack russell terrier")
So far our code is just outputting the responses to the console which is good but not great. So how can we make our project great? A great user interface will help users to quickly use the project.
So where do we need a user interface in our project? First of all a cool splash page that shows off the Linux Voice logo and what the project is all about. After that we need three dialog boxes, one for each of the inputs, that will respond to any of the triggers that may occur when our biscuit thief strikes.
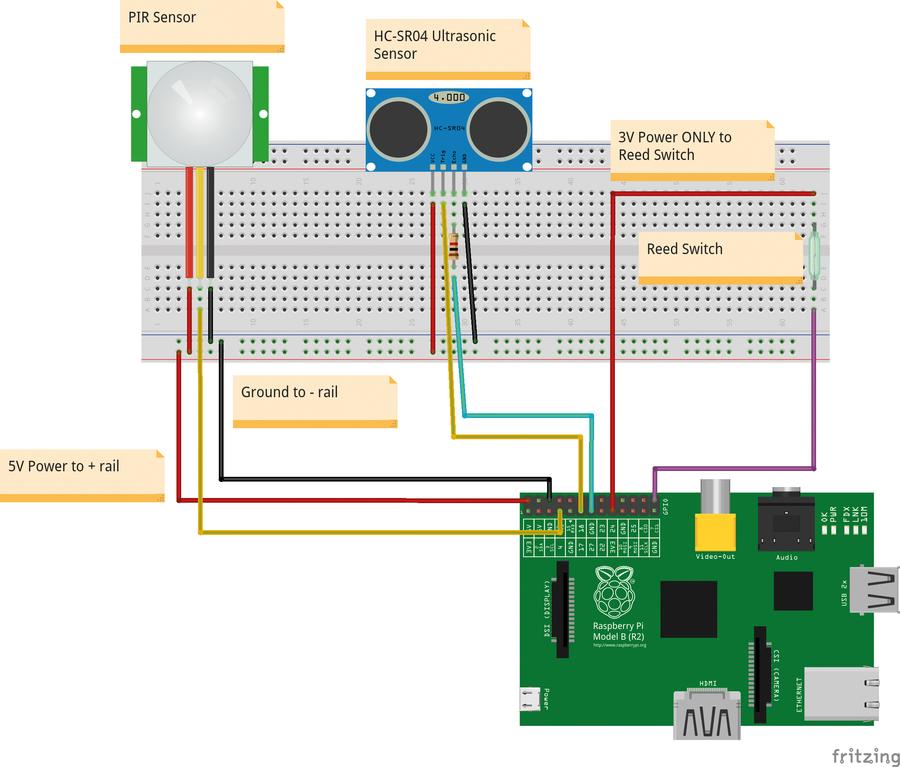
Here’s how the circuit is built – a larger version is available in the project’s GitHub repository, see box for details.
Installing EasyGUI
We’ve covered EasyGUI in previous issues of Linux Voice. It is the simplest method of creating a user interface, and can be inserted into existing code with relative ease.
There are two ways to install EasyGUI: via your package manager and via a special Python package manager.
First of all let us use the Raspbian package manager, which is called apt.
To install EasyGUI open a terminal and type in the code below followed by the enter key:
sudo apt-get install python-easygui
We can also use a Python package manager called PIP to install the packages and keep them up to date. But first we need to install PIP using the apt command.
In a terminal window type:
sudo apt-get install python-pip
sudo pip install easygui
Coding our splash screen
Using EasyGUI we need to replace the system starting text with a custom splash screen. To do that we need to create a folder called Images and download the Linux Voice logo (these files are included in the project files from GitHub). So in our code we first need to add one more variable in the form of:
logo = "./Images/masthead.gif"
And a list that contains the possible responses to a simple yes, no question.
activate = ["Yes","No"]
With those additions made, our focus turns to the welcome message that we earlier coded:
print("Welcome to the LV Biscuit Barrier - System Loading Please Wait")
time.sleep(2)
print("Scanning for intruders")
We can replace it with:
splash_title = "Linux Voice Biscuit Security System V2"
splash_msg = "Would you like to protect the biscuits?"
start = buttonbox(title=splash_title,image=logo,msg=splash_msg,choices=activate)
So we have a title in the form of the variable splash_title for our dialog box, and a question for our users in the form of splash_msg. The potential answers are stored in the list activate and this answer is saved as a variable start, which we will use in the next piece of code.
Our focus now shifts to line 58 of the code, which is the start of an if…else statement. We use the answer to the splash question to drive the activation of the project. If the user answers yes, then the main body of code is run; else if the user answers no, then the program exits:
Line 58
if start == "Yes":
…
Line 74
else:
print("EXIT")
Next we create three dialog boxes that will handle the reporting of incursions in our project. Our three triggers are a PIR sensor, a reed switch and an ultrasonic sensor, and we created three conditions in our code that look like this:
#First condition this handles the PIR sensor being tripped
if GPIO.input(PIR_PIN) == True:
print("Motion Detected near the biscuits")
time.sleep(1)
#Second condition handles the reed switch being triggered by our magnetic biscuit tin lid
elif GPIO.input(reed) == True:
print("Biscuit tin has been opened CODE RED!!!")
time.sleep(1)
#Our third and final condition uses the output from the ultra() function to tell us if the thief's hand is less than 10 cm away
elif distance < 10:
print("Biscuit thief has struck again, deploy ill tempered jack russell terrier")
For each we used a simple print function to handle the reporting, but instead of this let’s use a GUI dialog box. So for:
print("Motion Detected near the biscuits")
print("Biscuit tin has been opened CODE RED!!!")
print("Biscuit thief has struck again, deploy ill tempered jack russell terrier")
Replace with:
msgbox(title="Motion Detected", msg="--ALERT-- I have detected movement")
msgbox(title="Biscuit tin has been opened CODE RED!!!", msg="--ALERT-- I have detected that the tin has been opened")
msgbox(title="Hand in the biscuit tin", msg="--ALERT-- Biscuit thief has struck again, deploy ill tempered jack russell terrier")
We can see that the msgbox function has a simple syntax, and that it needs a title for the dialog box and a message to report to the user.
We have learnt how three different types of input work, how they are wired up to our Raspberry Pi and how we can create a Python program that will enable us to track down our biscuit thief. Yum!

Version 2 uses EasyGUI to create a simple user interface that’s a lot friendlier to use.
Where can I find the completed code?
I’ve made the code for this project publicly available via Github. For those that are familiar with Github you can clone the repository at https://github.com/lesp/LinuxVoice_Biscuit_Security or for those unfamiliar you can download the archive as a zip file from https://github.com/lesp/LinuxVoice_Biscuit_Security/archive/master.zip
Related Posts


About The Author
Les Pounder
Les Pounder is a maker and hacker specialising in the Raspberry Pi and Arduino. Les travels the UK training teachers in the new computing curriculum and Raspberry Pi.